Table Editor
<< Table | IBExpert | Field >>
The Table Editor can be used to analyze existing tables and their specifications, or to add new fields, specifications etc, in fact, perform all sorts of table alterations. It can be started directly from the DB Explorer by simply double-clicking on the relevant table in the IBExpert DB Explorer, or using the DB Explorer right-click menu Edit Table ... (key combination [Ctrl + O]).
The Table Editor comprises a number of pages, opened by clicking the corresponding tab heading, each displaying all properties which have already been specified, and allowing certain specifications to be added, altered or deleted. Use the IBExpert Options menu item, Object Editors Options, to specify which of the many Table Editor pages should be active, each time you open the Table Editor (e.g. instead of the Fields page always visible when the Table Editor is opened, specify the Data page, if you need to do a lot of data manipulation). Alternatively check the Restore last active page when editor reopened option, if this is more practical.
Note: the IBExpert status bar shows how many remaining changes may be made to the table before a backup and restore is necessary. (A total of 255 changes may be made to a database object before Firebird/InterBase® demands a backup and restore).
The Table Editor menu includes a comprehensive list of actions, the majority of which are also available in the Table Editor toolbar. Items not represented in the toolbar include the deactivation and activation of all triggers or indices, Empty table and Drop table:
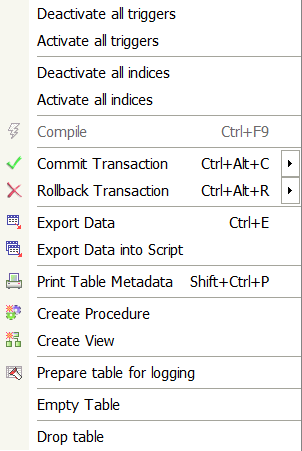
Support of online validation (only available in Firebird 2.5.4) can be realised by selecting Validate online from the Editor menu.
The Get Record Count button at the right of the Table Editor toolbar, displays the number of records in the table. To the right of this the table name is displayed. By clicking on the drop-down list, all tables for the connected database can be viewed and selected.
Alternatively for those competent in SQL - the SQL Editor, found in the IBExpert Tools menu or started using [F12] can be used directly for making table alterations using SQL code.
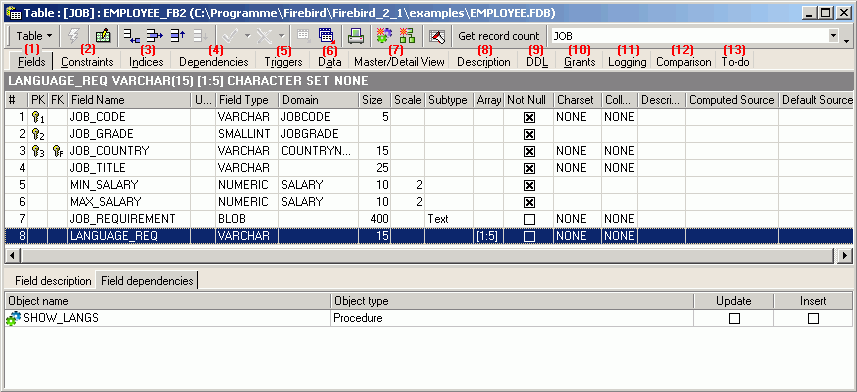
(1) Fields
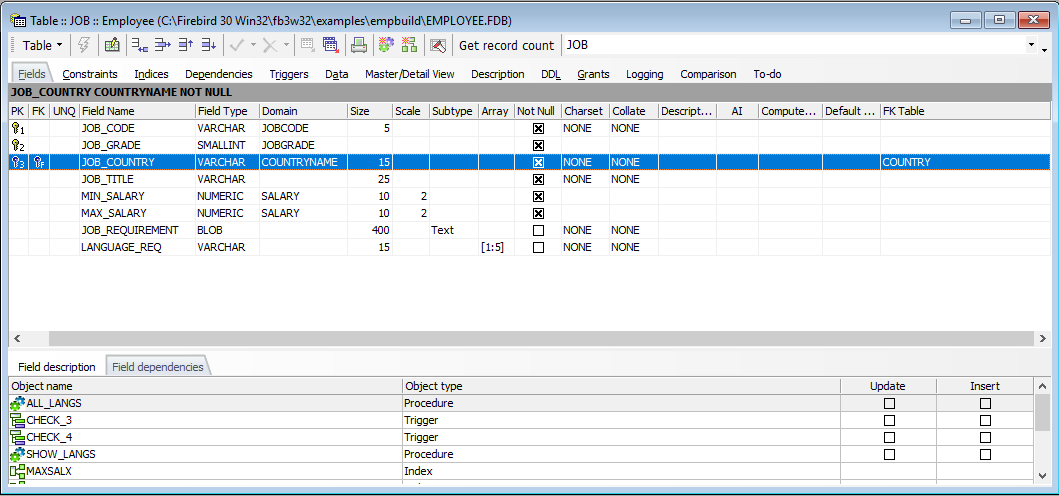
The many possible field specifications are listed on the Fields page. The individual columns are explained in detail under New Table. Fields can be amended by simply overwriting the existing specification where allowed. Please note that it is not always possible to alter certain fields once data has been entered, e.g. a field cannot be altered to NOT NULL, if data has already been entered which does not conform to the NOT NULL property (i.e. the field has been left undefined). Similarly a primary key cannot be specified following data entries with duplicate values.
Fields can be dragged 'n' dropped from the Database Explorer tree and SQL Assistant into the Table Editor's field list, allowing you to quickly and easily copy field definitions from one table to another.
Tip: as with all IBExpert dialogs, the fields can be sorted into ascending or descending order simply by clicking on the column headers (i.e. PK, FK, Field Name etc.) you wish to sort by. By double-clicking on the right edge of the column header, the column width can be adjusted to the ideal width.
The FK Table column (on the far right) displays the referenced table name if the field is a part of the foreign key.
Table Editor right-click menu
The Table Editor Fields page has its own context-sensitive menu opened using the right mouse button:
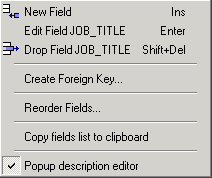
This can be used to add a New Field, or edit or drop an existing highlighted field.
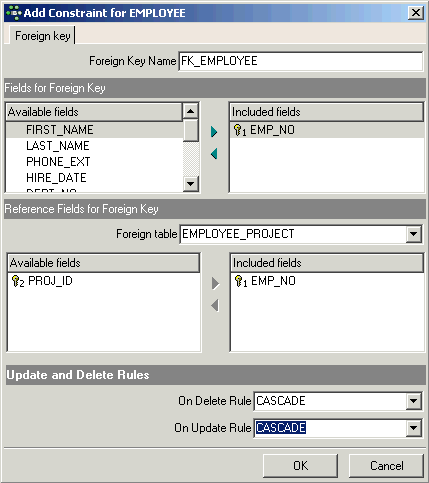
A foreign key can be created quickly and simply directly from the Fields page:
and it is possible to delete a foreign key directly from the fields list, if it exists.
The referenced table can be selected from the drop-down list, and the referenced field(s) simply marked and moved from the Included Fields and Available Fields areas by clicking on the arrow symbols in the middle.
Finally On Update and On Delete rules can be selected from the available options: NO ACTION, CASCADE, SET NULL and SET DEFAULT, before confirming with OK.
Fields can also be reordered using drag 'n' drop:
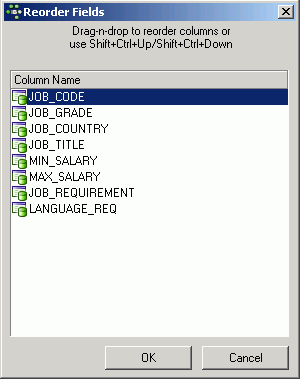
or key combinations [Shift + Ctrl + Up] and [Shift + Ctrl + Down] in the Reorder Fields window, or directly on the Fields page in Table Editor using the field navigator icons in the Navigation toolbar or previously mentioned key combinations.
A field list can also be copied to clipboard, and the pop-up Description Editor blended in or out.
New fields can be added using the

icon (or [Ins] key), to open the Adding New Field Editor (please refer to Insert Field for details).
Important! Do not forget to commit the transaction following creation, alteration or deletion of a field on the Fields page, otherwise the field alterations will not be displayed on the Data page, or any other Table Editor page for that matter.
In the lower part of the Table Editor the individual Field Descriptions and Field Dependencies can be viewed. The field dependencies list includes indices, primary and foreign keys. The Field dependencies list also includes the dependencies of referenced tables.
(2) Constraints
Constraints are used to ensure data integrity. Constraints give databases the extra integrity they need. Each constraint has its own context-sensitive right mouse button menu, and its own toolbar offers the most common operations as shortcuts.
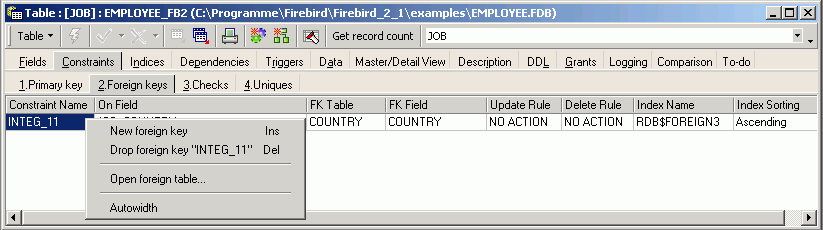
The right-click menu for the Foreign Key page offers, for example, New Foreign Key [Ins], Drop Foreign Key [Del], Open foreign table ... and Autowidth. Autowidth automatically adjusts the column widths to fit into the visible dialog width. The maximum constraint name length is currently 31 characters (expanded from 27 in 2005).
The following can be viewed, added or edited in the Table Editor under the Constraints tab:
- Primary keys: A primary key can officially only be defined at the time of defining a new table. There is however a workaround in IBExpert, should you ever find yourself in the situation, where you need to add a primary keys to existing tables (please refer to Adding primary keys to existing tables).
- Foreign keys: A foreign key is a link to another table and stores the primary key of another table. When defining a foreign key relationship, it is necessary to specify what should happen to the foreign key, if the primary key is updated or deleted. Please refer to Referential integrity and Cascading referential integrity for further information.
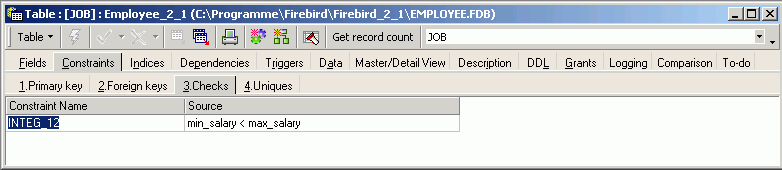
- Checks: Further conditions can be specified by the user (check constraint). Checks allows you to add a simple piece of logic so that every time you change that table, it's checked for validity. It's a way to be able to associate values on the same row. It is possible to define field constraints, e.g. the value in the PRICE field must be larger than 0 and smaller than 10,000. It is also possible to define table constraints in this way (e.g. delivery date > order date).
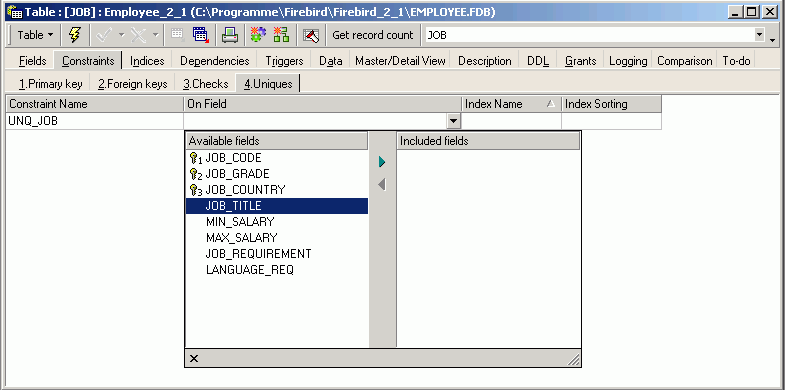
- Uniques: All fields defined as unique are also candidate keys. To define a field as unique in IBExpert, right-click on the Constraints / Unique page, and specify New unique constraint. Either accept or alter the default name UNQ_TABLENAME, and then click the drop-down list in the On Field column to select the field(s) you wish to specify as unique.
(3) Indices
Indices already defined for the table can be viewed on the Indices page. This page displays all the options offered by the Index Editor.
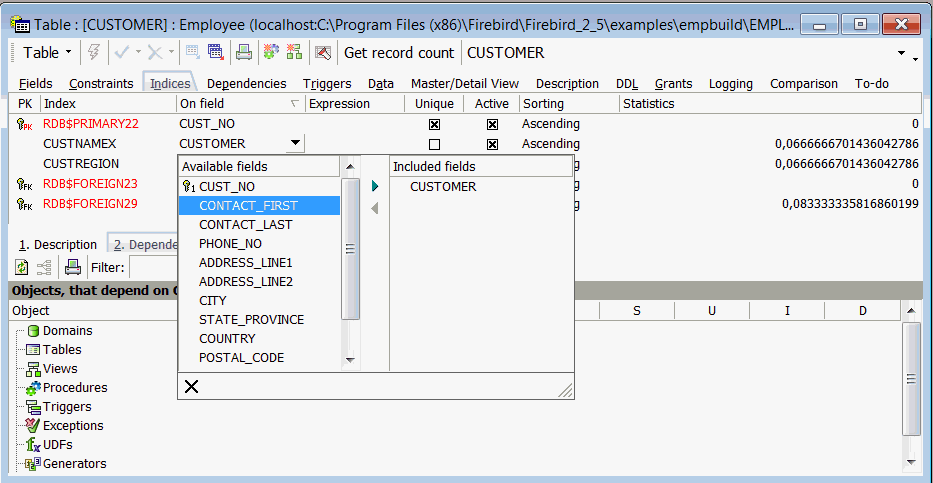
Information displayed includes key status, index name, upon which field the index has been set, whether it is unique, the status (i.e. whether active or inactive), the sorting order (Ascending or Descending) and the Statistics (displayed in older versions under the column heading Selectivity). Index descriptions can also be defined if wished. The Dependencies area displays any index dependencies. Those indices beginning with RDB$, are Firebird/InterBase® system indices.
Indices can be added or deleted using the right-click menu or [Ins] or [Del], or directly in the Index Editor. However, instead of deleting indices, we recommend deactivating them (simply uncheck the Active box by double-clicking) - you never know when you may need them again at a future date. System indices cannot be deleted. Alterations to indices can only be performed in the Index Editor.
Further options offered in the right mouse button menu are:
- Recompute Selectivity
- Recompute All
- Show statistics (blends the selectivity statistics in and out)
- Copy index name
Expression indices are also possible since Firebird 2.0. Arbitrary expressions applied to values in a row in dynamic DDL can now be indexed, allowing indexed access paths to be available for search predicates that are based on expressions.
Syntax
 CREATE [UNIQUE] [ASC[ENDING] | DESC[ENDING]] INDEX <index name>
 ON <table name>
 COMPUTED BY ( <value expression> )
Example
CREATE INDEX IDX1 ON T1
COMPUTED BY ( UPPER(COL1 COLLATE PXW_CYRL) );
COMMIT;
/**/
SELECT * FROM T1
WHERE UPPER(COL1 COLLATE PXW_CYRL) = 'ÔŰÂŔ'
-- PLAN (T1 INDEX (IDX1))
Please refer to the Firebird 2.0.4. Release Notes chapter, Enhancements to indexing for further index improvements in Firebird 2.0, and refer to the Firebird 2.1 Release Notes chapter, SQL2003 compliant alternative for computed fields for details of the new syntax, GENERATED ALWAYS AS implemented for the definitions of computed fields.
Although it is possible to set an index on multiple columns, this is not recommended, as an index on two fields simultaneously only makes sense when both fields are to be sorted using ORDER BY, and this should only be used on relatively small quantities of results as they can actually worsen performance rather than improve it.
See also:
Index
Database Statistics - Indices analysis
Firebird Administration using IBExpert: The Firebird Optimizer and index statistics
Firebird Administration using IBExpert: Automating the recalculation of index statistics
Recompute selectivity of all indices
SQL Editor / Plan Analyzer
SQL Editor / Performance Analysis
Firebird for the database expert: Episode 1 - Indexes
Recreating Indices 1
Recreating Indices 2
Firebird 2.0.4 Release Notes: Enhancements to indexing
Alter index
Drop index
CREATE INDEX
(4) Dependencies
(In some editors this is known as Used By.) Here the dependencies between database objects can be viewed. It also contains user-defined domains used in the object definition.
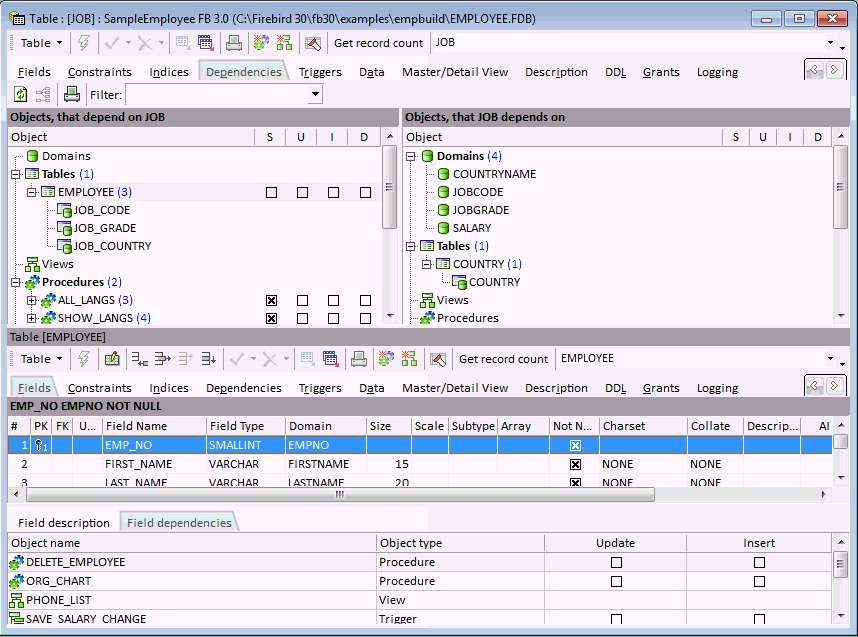
This summary can, for example, be useful if a database table should need to be deleted or table structures altered, or for assigning user rights to foreign key referenced tables. It displays both those objects that are dependent upon the table (left side), and those objects that the table depends upon (right side).
By entering a search string in the Filter field, you can filter certain object names in the dependency tree. Field names are also taken into account here.
The object tree can be expanded or collapsed by using the mouse or [+] and [-] keys, or using the context-sensitive right-click menu items Expand All or Collapse All. Further options included in the right-click menu include:
- Apply block to selected objects: this option allows users to process selected objects using custom IBEBlocks.
- Recompile all/selected procedures/triggers: here you can recompile all or all selected procedures/triggers listed in the dependencies tree.
- Drop Object: this option logically appears only when standing on a main database object node.
- Display Dependencies Tree...: this option opens a new window to display the dependencies for a selected node.
- Refresh
- Expand All
- Collapse All
- Display Operations: shows the actions S (=SELECT), U (=UPDATE), I (=INSERT) or D (=DROP). UPDATE OR INSERT and MERGE statements are also supported.
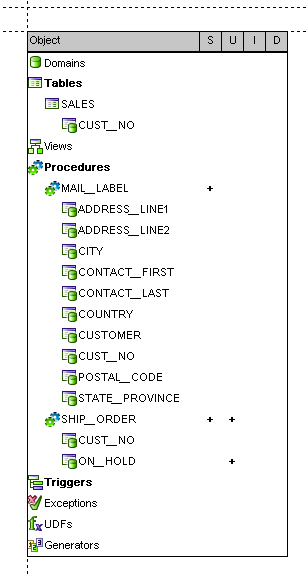
- Print Dependencies Tree: allows you to print either the left- or right-hand tree structure fully expanded with operations:
The object code can be viewed and edited in the Table Editor lower panel, provided the Inplace Objects' Editors option has been checked in the IBExpert Options menu item Environment Options / Tools. If this option is not checked, then the code may only be viewed in the lower panel, and the object editor must be opened by double-clicking on the respective object name, in order to make any changes to it. This also applies to all triggers listed on the Triggers page.
(5) Triggers
Triggers are SQL scripts, which are executed automatically in the database when certain events occur.
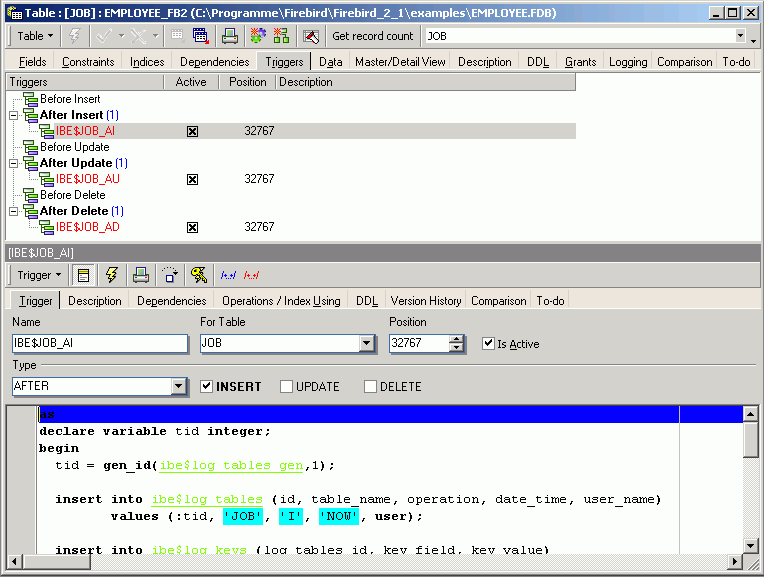
Similar to dependencies, the triggers are listed in a tree structure according to the following events:
BEFORE INSERT
AFTER INSERT
BEFORE UPDATE
AFTER UPDATE
BEFORE DELETE
AFTER DELETE
The object tree can be expanded or collapsed by using the mouse or [+] or [-] keys (or using the right-click menu).
When a trigger is highlighted, the right mouse button menu offers options to create a new trigger, edit or drop the highlighted trigger, or set the marked trigger (or multiple triggers) to inactive/active.
The trigger code can be viewed and edited in the Table Editor lower panel, provided the Inplace Objects' Editors option has been checked in the IBExpert Options menu item Environment Options / Tools. If this option is not checked, then the code may only be viewed in the lower panel, and the Trigger Editor must be opened by double-clicking on the respective trigger name, in order to make any changes to the trigger.
This also applies to all objects listed on the Dependencies page.
(6) Data grid
Here the data in the database table can be manipulated (i.e. inserted, altered or deleted) directly. The Data page can be opened directly from the DB Explorer when a table or view is selected, using the right-click context-senstive menu or [F9].
There are three modes of view:
1. Grid view - all data is displayed in a grid (or table form).
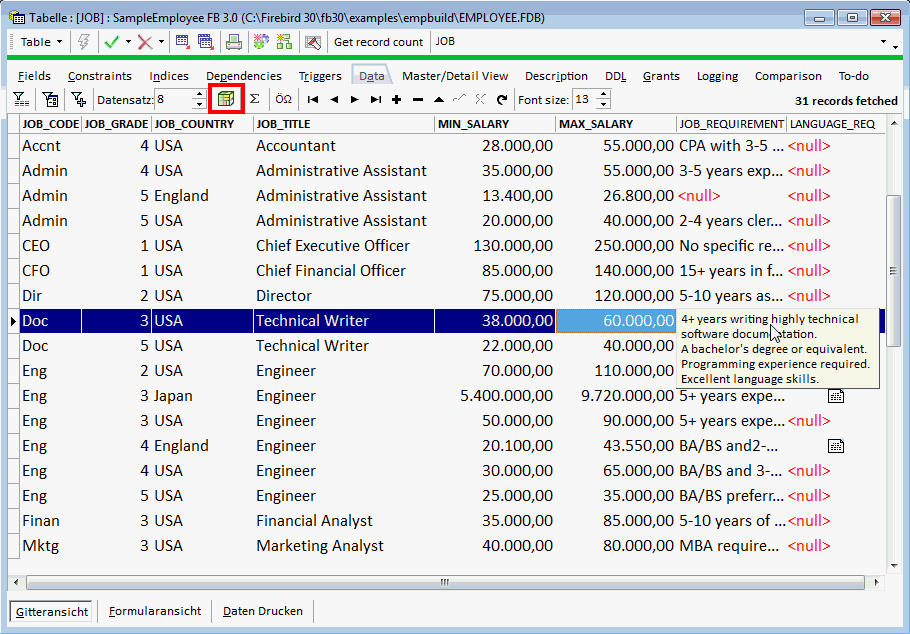
The data sets can be sorted according to any field in either ascending or descending order by simply clicking on the column header. New data sets can also be added, altered and deleted here. Please note that by default, the Refresh button refreshes only the current record, not the entire record set. You can change this in Options / Environment options / Grid / Full refresh...
It is also possible to edit Unicode data directly in the grid. And all operations, as with any operations performed anywhere in IBExpert, may be monitored by the SQL Monitor (started from the IBExpert Tools menu), particularly useful, should problems be encountered with SIUD operations.
The contents of blob and memo fields can be read by simply holding the cursor over the respective field. IBExpert displays them as a blob value; it is also possible to view and edit them in the Blob Editor (HEX format). And data tips for blob fields are shown in Unicode if necessary.
It is possible to change the font size used to display data. This also affects the Form View (both classic and compact), the memo/string edit dialog and Print data report. IBExpert saves and restores the altered font size value individually for each table/view/procedure.
If the OCTETS option (button) is down IBExpert displays CHAR/VARCHAR CHARACTER SET OCTETS strings in a hexadecimal representation. If there are no octets fields in a record set the OCTETS button is hidden.
The data can be further analyzed using the OLAP and data warehouse tool, Data Analysis, opened using the Data Analysis icon (highlighted in red in the above illustration).
There are many options to be found under Options / Environment Options / Grid, which allow the user to customize this grid. Under the IBExpert menu item Register Database or Database Registration Info there are additional options, for example, Trim Char Fields in Grids.
The Data page Grid view also has its own context-sensitive menu, opened by right-clicking with the mouse.
This includes the following options:
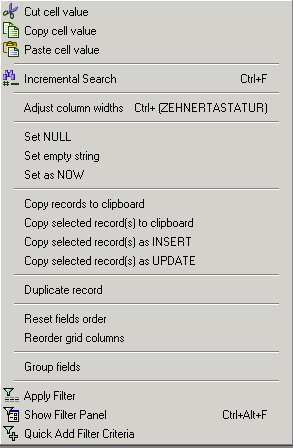
- Cut, Copy and Paste functions.
- Incremental Search [Ctrl + F] allows a quick search for individual entries by simply marking the desired column header, clicking the right mouse button menu item Incremental Search [Ctrl + F] and then typing the relevant digits/letters, until the required dataset(s) is/are found.
- Adjust Columns widths (or [Ctrl + "+" NUMBLOCK] adjusts all column widths in the grid view to the ideal width.
- SET commands: set field as NULL, empty or NOW.
- Copying operations: copies all or one or more selected records to clipboard, as INSERT or as UPDATE. Multiple records may only be selected if the Allow Multiselect option has been checked in the Options menu: Environment Options / Grid.
- Duplicate record option.
- Reset fields order: returns the field order to the original (not available in SQL Editor / Results).
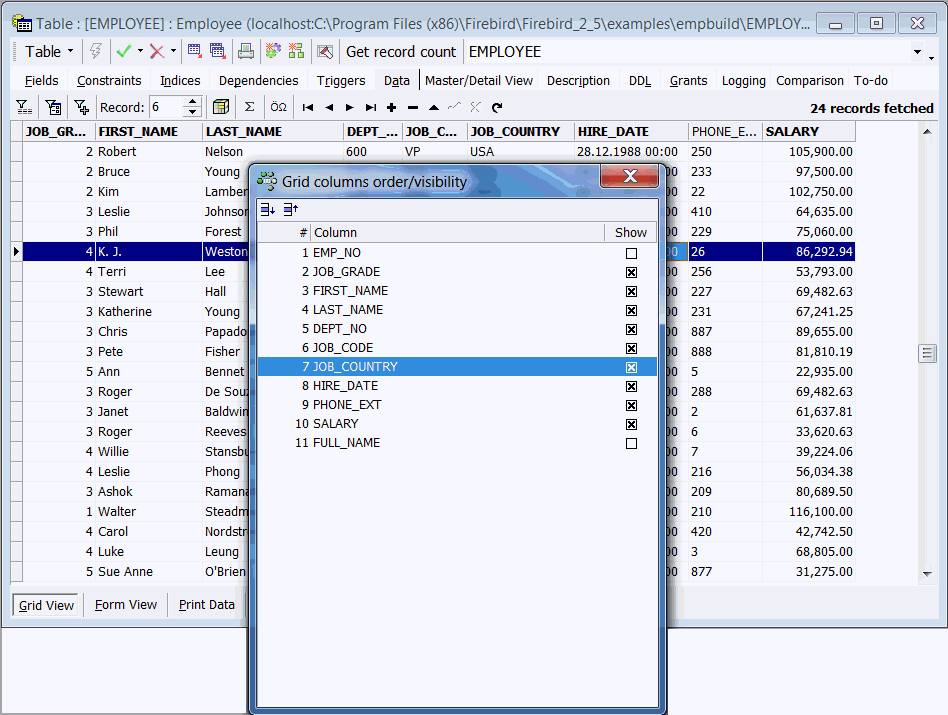
- Reorder grid columns: It is possible to move columns in the data grid directly by dragging the column headers to the position you wish them to be. This menu option however offers more. It opens a list of all fields:
- Group/Ungroup Fields: offers an alternative visual option, allowing grid columns to be grouped, which is sometimes useful, for example, if you need to execute a complex query with joins of many tables. The Grouping feature is displayed as a dark gray bar labeled Drag a column header here to group by that column, displayed directly above the column headers over the grid. Should this not be visible, go to the IBExpert Options menu item, Environment Options / Grid, and ensure that the Allow records grouping option is checked. The column header simply needs to be dragged and dropped onto the gray bar, to group by that column. A reorganized data view appears, where the group contents can be revealed or hidden, by clicking on the + or - buttons (see illustration below).
- Filter options: these can also be found in the data page toolbar (see below).

Both the Grid and Form views offer a Navigation toolbar, allowing the data to be moved, inserted, altered and deleted. Note that when deleting data, the Firebird/InterBase® database becomes larger, as the data is merely flagged as deleted, due to the rollback option, which is available until the drop commands are committed.
IBExpert also offers a Test Data Generator (IBExpert Tools menu), should test data be required for comparing query times etc.
Data can be filtered using the Filter Panel toolbar. (Please refer to Filter Panel for further information.)
Furthermore aggregate functions can be calculated (COUNT, SUM, MIN, MAX, AVG) on numeric and DATE / TIME columns. Simply click the Show summary footer button on the toolbar of the data view to display the summary footer:
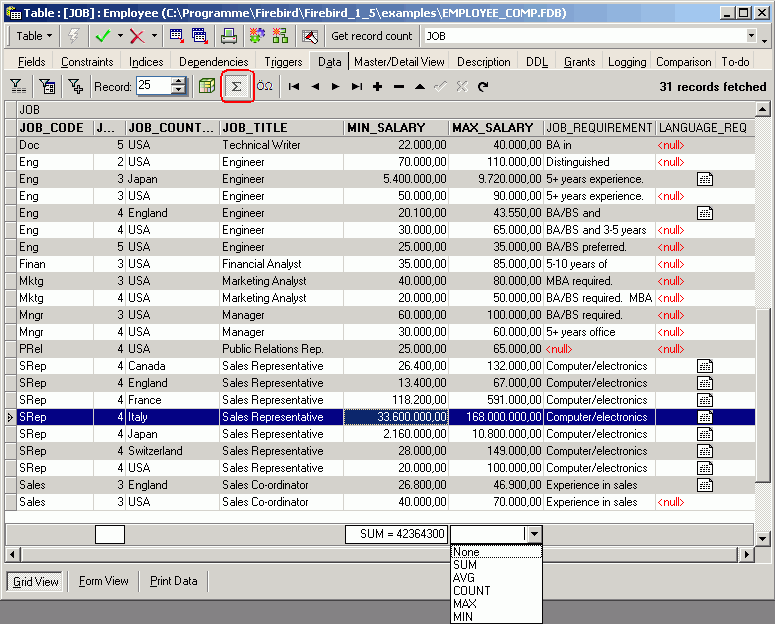
It is then possible to select an aggregate function for each numeric/datetime column separately.
IMPORTANT: this feature performs all calculations on the client side, so do not use this function on huge datasets with millions of records because IBExpert will fetch all records from the server before calculating.
Data can also be displayed as Unicode. Click the relevant icon in the Navigation toolbar (see illustration below) or use [F3]. It is not possible to edit the data directly in the grid. To edit data in Unicode, use the Form View or modal editor connected with string cell.
2. Form view - one data set is displayed at a time in a form.
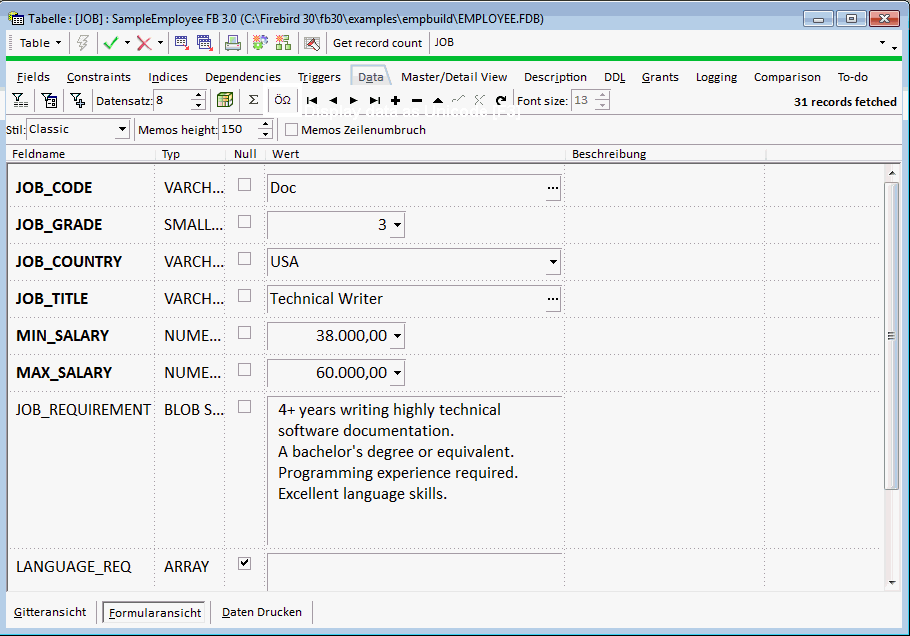
The Form view displays field descriptions. It is possible to select alternative layouts (classic or compact), the compact alternative for those who prefer a more condensed and faster interface. Visual options now also include specification of Memo Height and Memo Word Wrap.
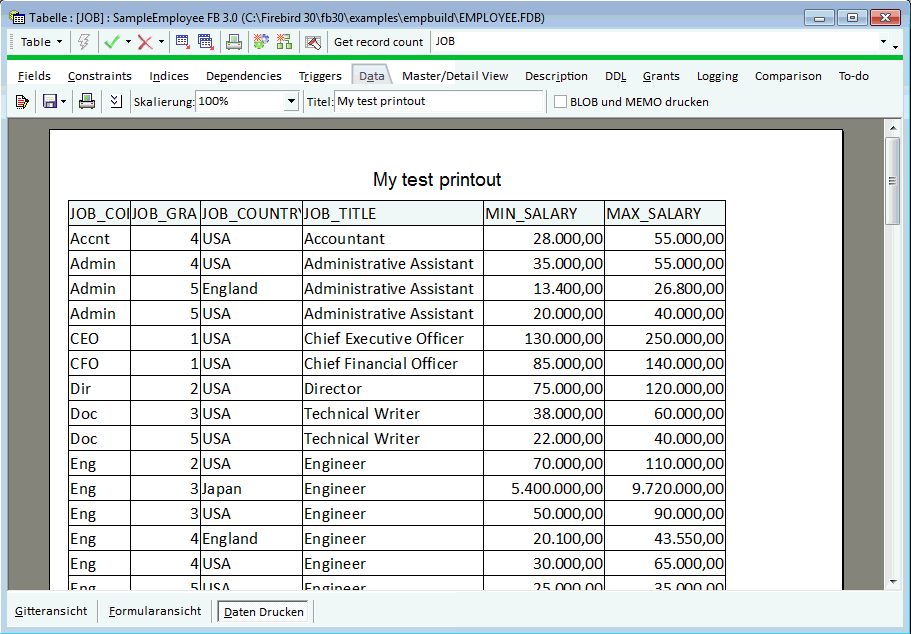
3. Print data - displays data in WYSIWYG mode (the status bar showing which page number is currently visible and how many pages the data covers altogether). The data can be either saved to file or printed.
The Print data view also has its own right-click menu, enabling size adjustments (2 pages, whole page, page width, and scaling from 10% to 200%), this being also available as a pull-down list of options in the Print Preview toolbar. Further toolbar options include saving the information to file, printing directly, and specifying the page set up. There is even a check option to specify whether BLOB and MEMO values should be printed or not.
Export data

Tutorial
(This feature is unfortunately not included in the free IBExpert Personal Edition?.)
Data can be exported from the Data page in the Table Editor and View Editor, the Results page in the SQL Editor and from the ODBC Viewer, by simply clicking the
icon or using the key combination [Ctrl + E] to open the Data Export window.
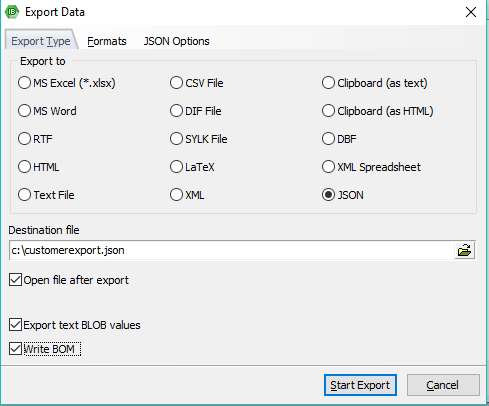
The first page in the Export Data dialog, Export Type, offers a wide range of formats, including Excel, MS Word, RTF, HTML, Text, CSV, DIF, SYLK, LaTex, XML, Clipboard (as text), Clipboard (as HTML (CF_HTML), DBF, XML spreadsheet and JSON, all of which can be simply and quickly specified per mouse click (or using the directional keys). The Write BOM option is for CSV and text export types.
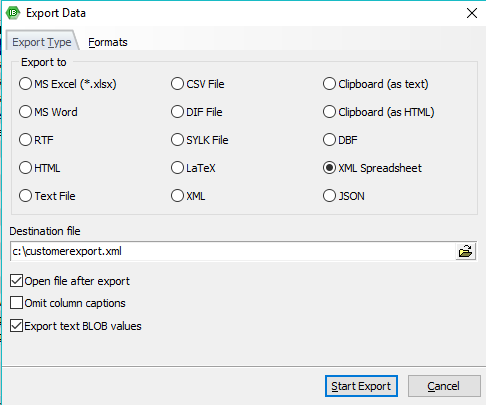
The destination file name must also be specified, and check options allow you to define whether the resulting export file should be opened following the data export or not, and - for certain export formats - whether column headings should be omitted or not, and whether text blob values should also be exported.
Should you encounter problems when exporting text blob values, please check that the Show text blobs as memo option is checked on the Grid page found under the IBExpert menu item Options / Environment Options.
Depending on the format, further options can be specified on the second and third pages, Formats and Options, specific to the export type. The Formats page is available for all export types, with the exception of XML.
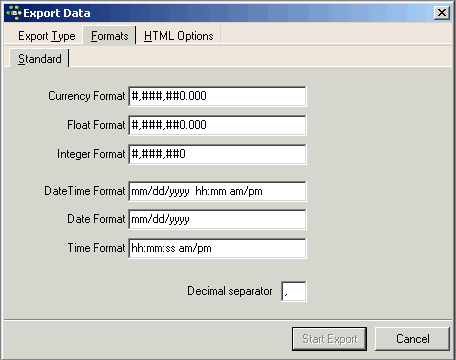
Here it is possible to specify a range of numerical formats, including currency, float (and Firebird 4 DECFLOAT values), integer, date, time or date and time, as well as the decimal separator. Please note that not all of these options may be altered for all export types (for example when exporting to DBF it is only possible to specify the formats for date/time and time; exporting to JSON offers you the options, Readable: if enabled, JSON data will be formatted to make it readable for human eyes, and Write BOM: if enabled an UTF-8 BOM will be written at the beginning of the file).
Depending upon which format has been specified, additional options may be offered on the third page, for example:
- Excel - specification of page header and footer.
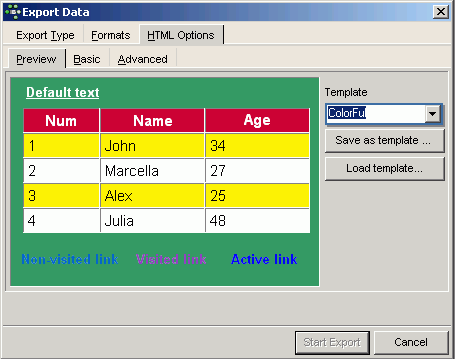
- HTML - template selection and preview, title, header and footer text as well as a wide range of advanced options.
- CSV - Quote String check option, and user specification of CSV separator.
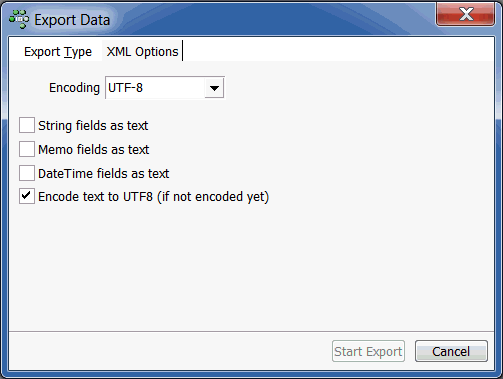
- XML - Encoding format may be selected from a pull-down list. There are also check options to export String, Memo and DateTime fields as text. It is also possible to convert text values to UTF8 when UTF8 encoding is selected. This option should only be used if your data is in ANSI.
- DBF - check options to export strings to DOS, long strings to Memo, and to extract DateTime as Date.
The export is then finally started using the Start Export button in the bottom right-hand corner. Following a successful export, a message appears informing of the total number of records exported.
Using the right-hand icon in the SQL Editor toolbar or Table Editor toolbar (Export data into script) the data can be exported into an insert SQL script (without the blob fields).
See also:
Import & export using IBExpert (1)
Import & export using IBExpert (2)
IBEBlock examples including data import and export
Firebird administration: import & export
Import data
Export data into script
Tutorial
The Export Data into Script dialog can be started using the

icon on the Data page in the Table Editor and View Editor, the Results page in the SQL Editor or from the ODBC Viewer.
The following options may be selected before starting the export:
- Export into: File, Clipboard or Script Executive.
- Export as: INSERT statements, UPDATE statements, UPDATE OR INSERT statements or as a set of EXECUTE PROCEDURE statements.
Specify the file name if exporting to file and the table name from which the data is to be exported. The Fields page allows the table fields to be selected.
The Options page:
offers a number of options including replacement of non-print characters in strings with spaces, removal of trailing spaces and control characters from string values, date and time specification, use of the ANSI prefix for date/time values, whether the CREATE TABLE statement should be added into the script, or the DELETE FROM <TABLE> statement. When the Export blob values as hex strings option is ON, blob values will be written directly into the VALUES clause of INSERT statements as hex strings like the following:
... VALUES (..., X'0A66756E6374696F6E2024242873297B72', ...)
This representation is supported in Firebird 2.5. Unfortunately the length of DML/DDL statements in Firebird/InterBase® is limited to 64 kilobytes, so it is very easy to get statements with a length > 64 Kb using this method, and they cannot be executed by the server.
Further options include whether the values of MEMO fields should be exported as strings or not and whether CR+LF and extra spaces between statement parts should be removed or not.
The option to put statements into Firebird blocks (EXECUTE BLOCK) was implemented in IBExpert version 2021.02.09.
The Insert 'COMMIT' after each x records default value of 500 records can be manually altered if wished.
The Additional page allows additional definitions for query to be made, for example, ORDER BY or WHERE clauses.
After completing all specifications as wished, simply click the Export button to perform the data export.
For information regarding the ODBC Viewer's Export data into a table functionality, please refer to Export data into a table. Further information regarding data and file import and export can be found in the following documentation articles:
- Import data
- Import & export using IBExpert (1)
- Import & export using IBExpert (2)
- IBEBlock examples including data import and export
- Firebird administration: import & export
(7) Master/Detail View
The Master/Detail View allows you to view data of tables that reference or are referenced by the current table by a foreign key.
It is even possible to edit Master/Detail data here if wished.
(8) Description
As with the majority of the IBExpert Editors, the Table Editor's Description page can be used to insert, edit and delete text by the user as wished. It enables the database to be simply and quickly documented.
(9) DDL
This displays the database table definition as SQL script.
Similar to the Metadata option offered in Extract metadata, when the Decode domains checkbox option is activated, the domain types will be inserted as comments just after domain names. For example:
 CREATE TABLE Z (
       B BOOL /* INTEGER DEFAULT 0 CHECK (VALUE IN(0,1)) */
 );
This DDL text cannot be edited here, but it can be copied to clipboard.
(10) Grants
Here individual users can be assigned rights to SELECT, UPDATE, DELETE and INSERT for the current table. In some cases rights can also be assigned to individual fields.
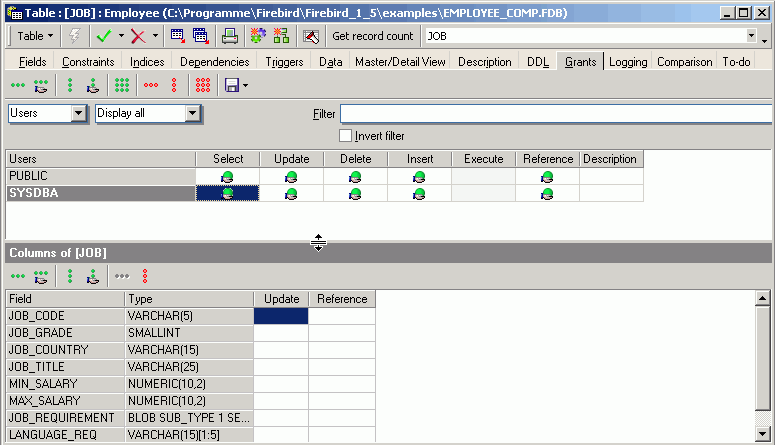
Using the drop-down list, grants can also be assigned not just for users and roles, but also for views, triggers and procedures in the same database, without having to leave the Table Editor.
For more details regarding this subject please refer to Grant Manager.
(11) Logging 
Data manipulation can be documented here in system tables generated by IBExpert. When this page is opened for the first time, IBExpert asks whether it should generate certain system tables:
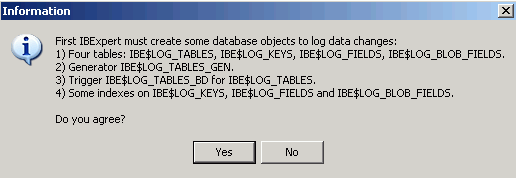
After confirming and committing, you will need to prepare all tables for logging using the respective menu item found in the Log Manager, which is located in the IBExpert Tools menu. Once the preparation has been successfully committed, you can specify whether you wish to log insert, update and/or delete actions.
After generating the script (using the green arrow icon or [F9]), triggers are created for the table, and from now on, regardless of which program or user makes any changes, all specified alterations are now logged.
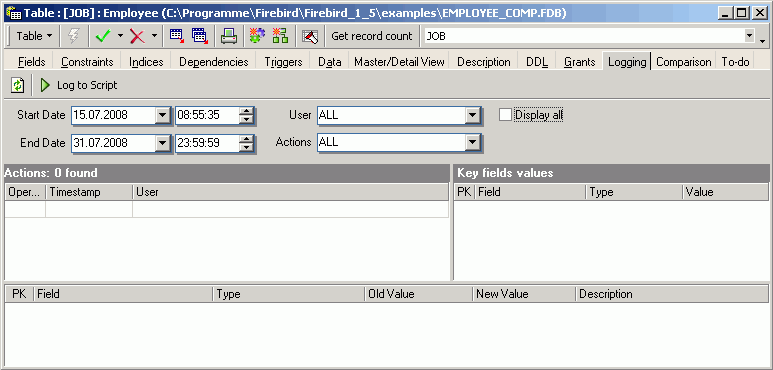
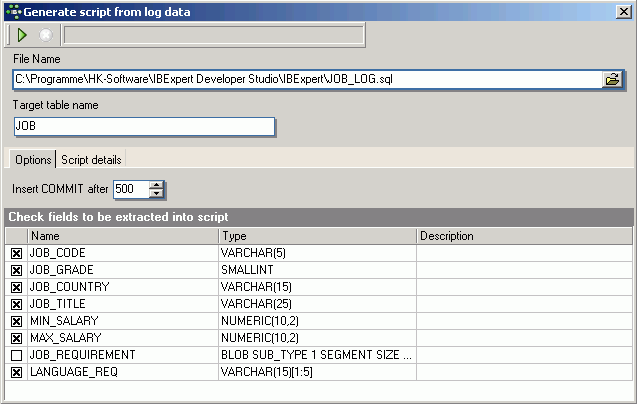
Log to script by clicking the respective button:
The log file name, how often should be committed and which fields should be logged can be stipulated on the Options page. And the beginning and end of script may be specified under Script Details if wished. The script can then simply be generated using the respective icon or [F9].
In order to integrate the prepared database object and individual fields into the Logging file, you will need to use the IBExpert Tools menu item, Log Manager.
Disable automatic logging
Since IBExpert version 2021.02.09 it is possible to disable the automatic refreshing of log data. To disable theautomatic refresh put the following function call into the "After IBExpert starts" event block:
ibec_SetGlobalVar('IBE$TDL_DISABLE_AUTO_REFRESH', TRUE);
To disable the automatic refresh for a specified database:
ibec_SetGlobalVar('IBE$TDL_DISABLE_AUTO_REFRESH.123', TRUE);
where 123 is a unique identifier of the registered database.
(12) Comparison
The Comparison page allows you to compare a selected database object with one in another (comparative) database. The comparative database must first be specified in the IBExpert Database Registration Info (Comparative Database).
To perform a comparison simply open the object to be compared, click the Comparison tab and select the comparative database:
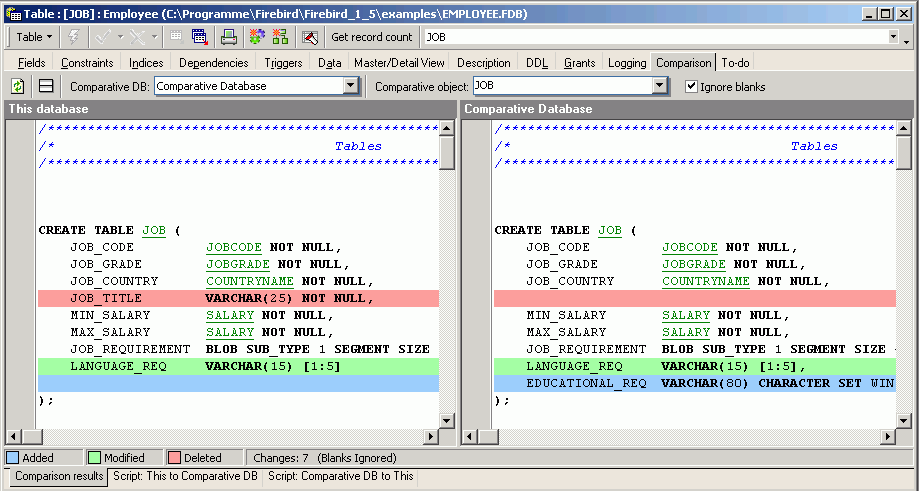
Uncheck the Ignore Blanks checkbox if wished and then click the top left icon (Compare Again) to perform the object comparison. The status bar displays the color key, so that the type of alterations made are immediately apparent, as well as the number of changes made.
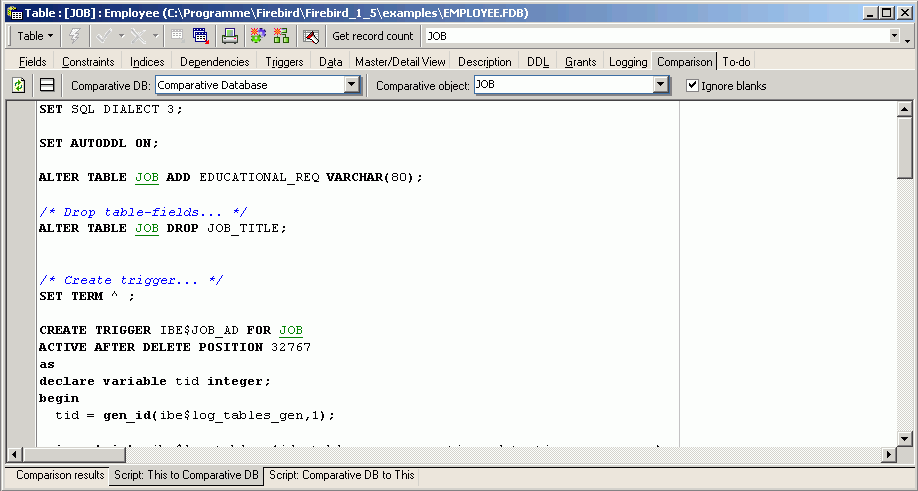
Below the status bar, there are a further two pages: Script: This to comparative DB and Script: Comparative DB to This. Both scripts are supplemented with comments, so that it is quick and simple to detect which alterations need to be made where, in order to update the object either in the main or the comparative database.
(13) To-do
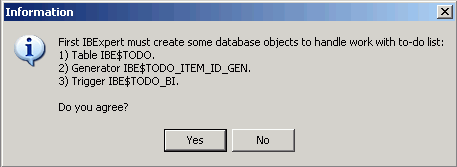
This feature can be used to organize your database development. When this page is opened for the first time, IBExpert asks whether it should generate certain system tables:
After confirming and committing, you can add to-do items for each object in the database:
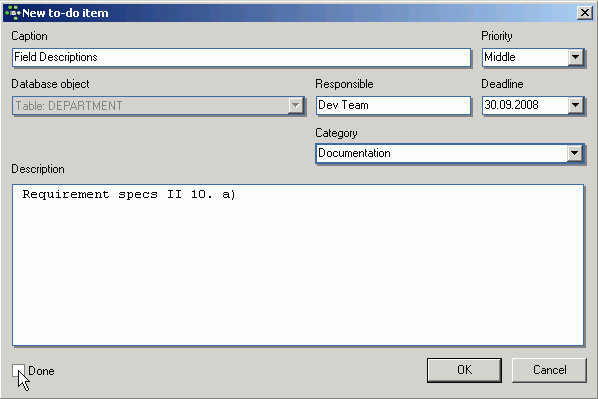
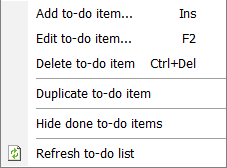
Use the context-sensitive menu to add, edit or delete to-do items, hide those that have been done, refresh the to-do list, or duplicate to-do item.
A full list of all to-do items for all database objects can be viewed, edited and deleted in the IBExpert Tools menu item, To-do list.
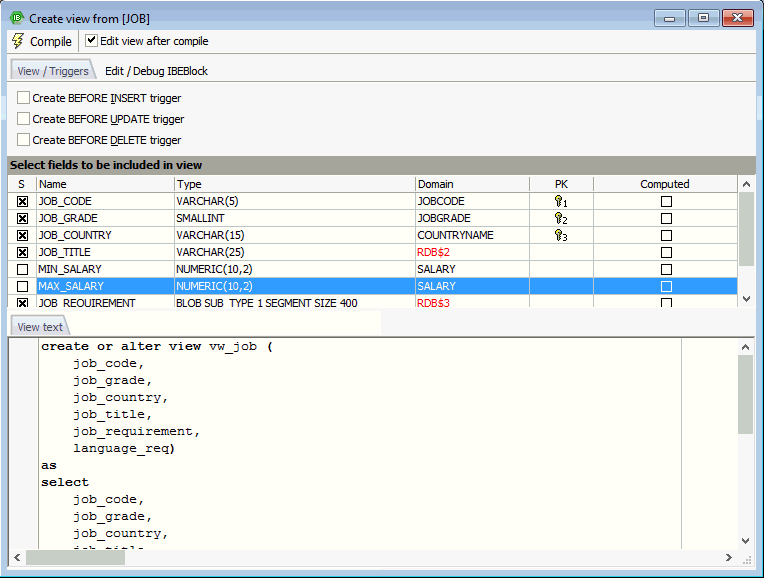
Create view from table (updatable view)
It is possible to create a view directly from a table, using the Table Editor's Create View icon:

View / Triggers page
Select the trigger type simply by activating/deactivating the relevant trigger type checkbox (BEFORE INSERT, BEFORE UPDATE, BEFORE DELETE).
The list of fields to be included in the view may be specified by clicking on the check boxes to the left of the field names, or by double-clicking or using the space bar on a selected field.
The view code is displayed in the lower window and may also be amended as wished.
As with the view default name, the trigger default name is automatically generated by IBExpert, comprising the prefix VW_ followed by the table name and ending with the trigger type suffix (_BI = Before Insert, _BU = Before Update, _BD = Before Delete). This can of course be overwritten if wished.
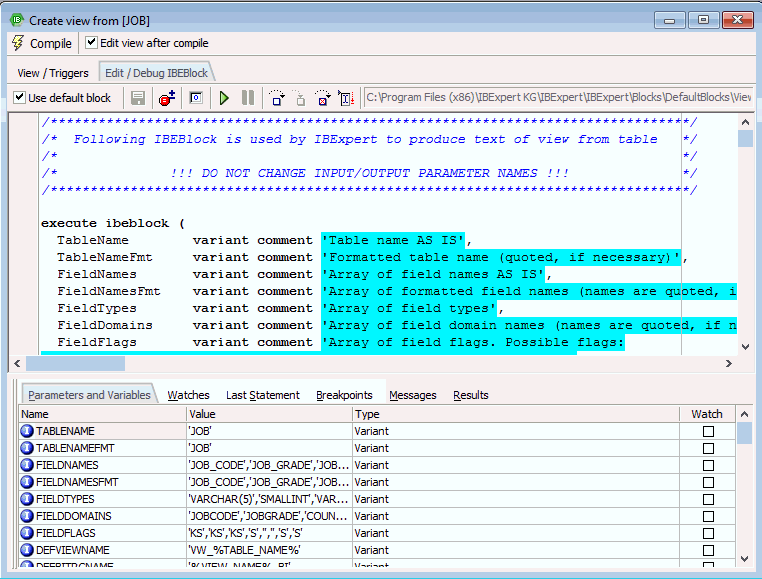
One or more trigger types may be specified - whereby further tabs appear in the lower area, allowing the pre-defined trigger code to be simply amended as wished, automatically creating an updatable view - this is, in fact, an extremely quick and simple way to create a view that is updatable, and which can otherwise only be realized with considerable manual labor! These triggers are already prepared, and require little work in order to create an updatable view.
Finally compile and commit to create the new view or updatable view.
Edit / Debug IBEBlock
Create procedure from table
A procedure can be created directly from a table, using the Table Editor's Create Procedure icon:

Alternatively select a table in the IBExpert DB Explorer and use the right-click context-sensitive menu item, Create SIUD procedures. The sort of procedure to be created can be specified by checking/unchecking the boxes in the upper area.
Options include:
- SELECT
- INSERT
- UPDATE
- DELETE
- INSERT/UPDATE
with further checkbox options to:
- Create refresh procedure returns a single record specified by the primary key value.
- Grant necessary privileges on used tables option.
- Grant execute to PUBLIC after creating
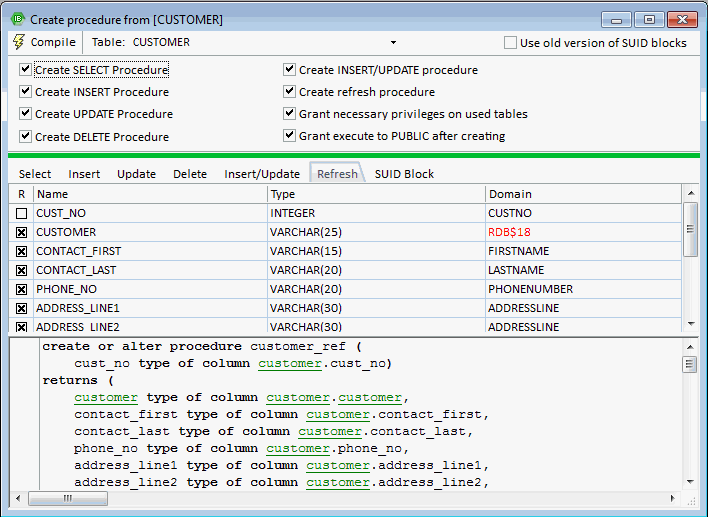
A procedure default name is automatically generated by IBExpert, comprising the table name followed by one of the following suffixes:
- S = SELECT
- I = INSERT
- U = UPDATE
- D = DELETE
- IU = INSERT/UPDATE
This name can of course be overwritten or altered directly in the code if wished.
The list of fields to be included in the procedure may be specified by clicking on the check boxes to the left of the field names, or by double-clicking or using the space bar on a selected field.
The procedure text is displayed in the lower window and may also be altered if wished. Switch from one page to the next by clicking on the tabs (displayed above the fields lists).
Finally compile and commit to create the new procedure.
The SUID block was completely redesigned at the end of 2008 to provide better support of the TYPE OF feature and integrated debugging. IBExpert now uses only IBEBlock to generate SUID procedures. The old versions of SUID block are still available for compatibility.
It is also possible to change a processed table directly in the Create SUID Procedures form.
See also:
Table
Grant Manager
Log Manager
Database Registration Info
DCL-DataControlLanguage
DDL-DataDefinitionLanguage
DML-DataManipulationLanguage
back to top of page
<< Table | IBExpert | Field >>


