SQL Editor
<< External Tools | IBExpert | New SQL Editor >>
The SQL Editor is an IBExpert tool which simplifies the input of SQL commands. It is used to create and execute SQL queries and view and analyze the results.
It is an essential part of IBExpert. As a rule, all work on a database is performed using SQL. The SQL Editor allows you to execute DML and DDL statements, analyze query plans and query performance, move data between databases, export query results into many formats, create views and stored procedures from SELECT etc. A full list of Firebird error codes can be found in the Firebird 2.1 error codes documentation.
The SQL Editor is intended for the execution of single commands. The Script Executive should be used for more complex scripts.
If you are new to Firebird/InterBase® SQL, please refer to Firebird Development using IBExpert for a comprehensive introduction to SQL. The following Language references provide references to all Firebird/InterBase® SQL keywords, syntax and parameters:
- SQL Language Reference
- Firebird 2 Language Reference Update
- Firebird 2.1 Language Reference Update
- Firebird 2.5 Language Reference Update
The SQL Editor can be started by selecting the IBExpert Tools menu item, SQL Editor, clicking the respective icon in the Tools toolbar, or using [F12]. This cleans the active SQL window for new input. An additional SQL Editor can be opened using Tools / New SQL Editor or [Shift + F12]. If you are using the SQL Editor for the first time, please first refer to SQL Code Editor for an overview of the many functionalities all IBExpert code editors have to offer. It is possible to start the SQL Editor without an active database connection to execute IBEBlocks and to search for queries.
When creating stored procedures or triggers using the DB Explorer menu item New Procedure or New Trigger, an SQL Editor window is also opened. As these editors offer certain additional features (such as lazy mode, debugger), please refer to Stored Procedure or Trigger for specific details.
The SQL Editor can be used together with the DB Explorer to quickly insert database object names (e.g. table fields can be marked and moved from the DB Explorer or the SQL Assistant into the SQL Editor using drag 'n' drop).
More than seven tables should not be incorporated into an SQL, as this is too time-consuming for Firebird/InterBase® to analyze the indices in order to determine the most efficient solution. The database server therefore simply starts randomly, which leads to slow and lengthy queries.
A stored procedure or view can be created from the current query directly in the SQL Editor, using the respective icons in the SQL Editor toolbar (see Create view or procedure from SELECT below). It is possible to turn query parameters into the input parameters of a stored procedure. It is also possible to create stored scripts/blocks (which are stored in the IBE$SCRIPTS table) from the SQL Editor content using the new icon on the SQL Editor toolbar: "New script/block". Ten SQLs can be incorporated into a stored procedure.
The Tools / SQL Editor menu item includes the following:
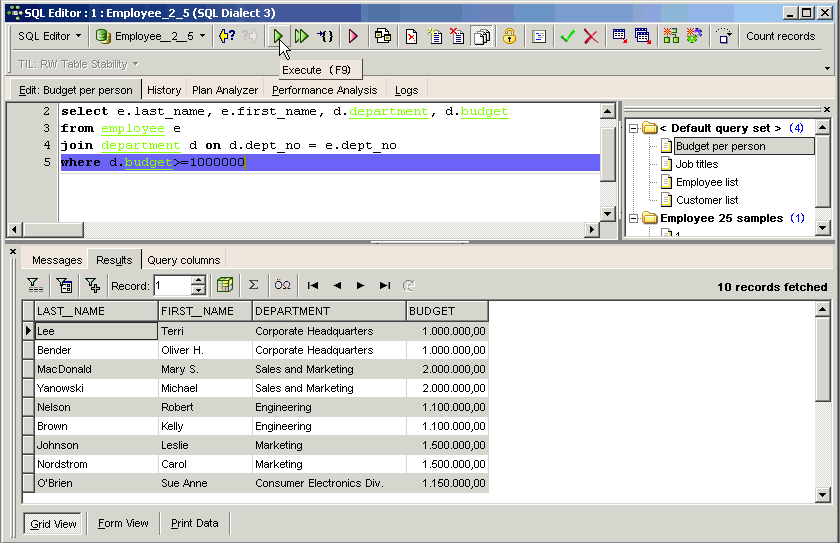
The Edit window is the main input window for all SQL transactions. The History page lists previous queries. The Plan Analyzer provides information in a tree structure with statistics. A statistical summary can also be viewed in the lower panel on the Messages page. The Performance Analysis shows how much effort was required by Firebird/InterBase® to perform this query.
For those not yet competent in SQL, the Visual Query Builder is there to make life easier! It is ideal for the beginner, although somewhat limited for more advanced work; more complex queries would need to be performed in the SQL Editor or perhaps even the Script Executive.
To access the Visual Query Builder simply click the

icon in the SQL Editor toolbar, or use the key combination [Ctrl + Alt + B].
To customize the SQL Editor, please refer to the IBExpert Options menu items, Editor Options and Environment Options / SQL Editor.
SQL Editor Menu
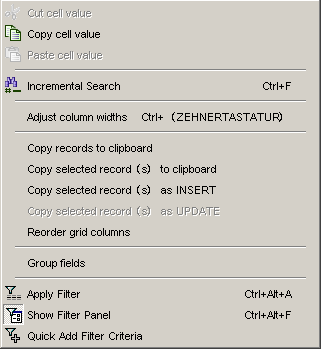
In addition to the icons in the SQL Editor toolbar, the SQL Editor has its own menu, opened using the right mouse button:
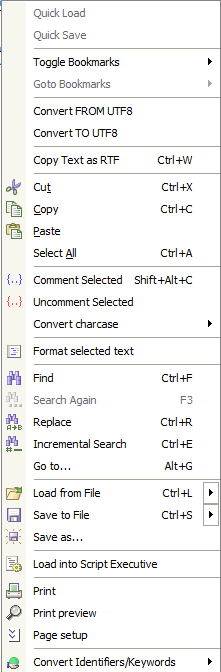
The most important menu items are detailed in this section or can be found in the IBExpert Edit menu and SQL Code & Text Editors.
Bookmark
Bookmarks are useful for flagging sections of long SQL scripts. They are purely an aid for the user and have no influence upon the SQL script or database whatsoever.
Bookmarks can be set in the SQL Editor and in the code editor in the Stored Procedure and Trigger Editors, using the mouse right-click menu item Toggle Bookmarks. They can alternatively be specified using the key combination [Ctrl + Shift + 0-9].

The bookmarks themselves can be seen in the left margin of the SQL Edit window. They can be numbered as wished. The mouse right-click menu item Go To Bookmarks can be used to spring from bookmark to bookmark. Alternatively the key combination [Ctrl + 0-9] can be used.
Bookmarks can be removed by simply unchecking those bookmarks listed in the Toggle Bookmarks menu.
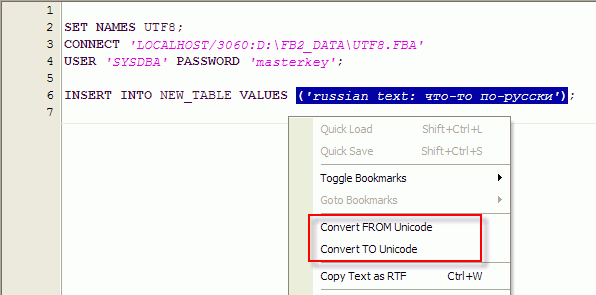
Convert FROM Unicode / Convert TO Unicode
To convert strings from/to unicode use the corresponding items of the code editor's popup menu:
Copy Text as RTF
In order to copy a script, including the text formats (color, bold, indent etc.), select the script or script parts to be copied, right-click and select the menu item Copy Text as RTF (or [Ctrl + W]).
This feature is ideal, for example, for documentation purposes.
Comment Selected/Uncomment Selected
In certain situations it may be necessary to disable certain commands or parts thereof. This can be easily done without it being necessary to delete these commands. Simply select the rows concerned, right-click and select the menu item Comment Selected (or using [Ctrl + Alt + .]). This alters command rows to comments.
The commented text can be reinstated as SQL text by using the right mouse key menu item Uncomment Select (or using [Ctrl+ Alt + ,]).
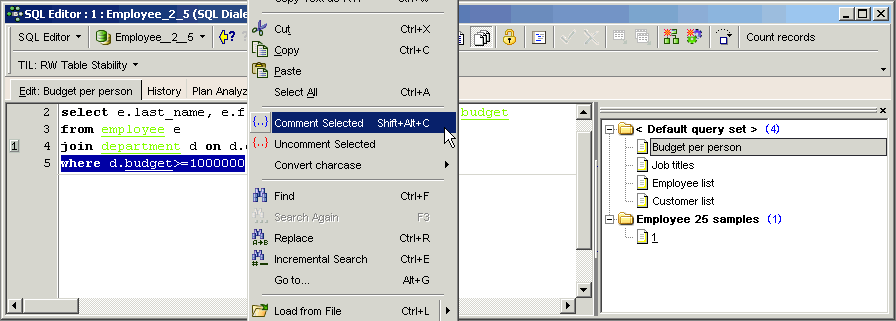
This is particularly useful when attempting to discover error sources or performing parts of standard SELECTs.
It is also possible to use the Quick comment feature available in all IBExpert code editors. Using the [Ctrl] + [Alt] + [.] shortcut (or select the right-click menu item, Comment selected), you can quickly comment the current selection of code or selected block. And use the right-click menu item, Uncomment selected or [Ctrl] + [Alt] + [,] shortcut to unselect.
Convert Charcase
The mouse right-click menu item Convert Charcase offers the following options to alter the appearance of the SQL characters:
- Convert to lower case [Alt + Down]: allows the selected text to be converted completely to lower case.
- Convert to upper case [Alt + Up]: allows the selected text to be converted completely to upper case.
- Convert to name case: allows the selected text to be converted completely to name case, i.e. the initial character of each word is written in upper case, the remaining characters in lower case.
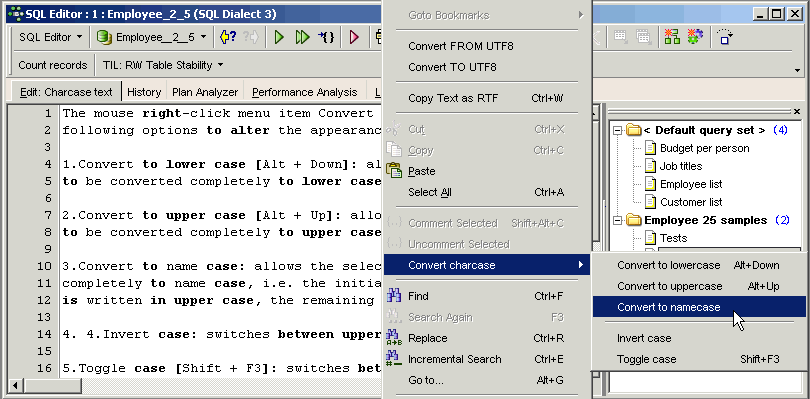
- Invert case: switches between upper and lower case.
- Toggle case [Shift + F3]: switches between upper, lower and name case.
Query Manager
The Query Manager is only available if the IBExpert User Database (Options / Environment Options / User Database) is used as a main storage.
It can be viewed in the panel to the right of the main Edit window and allows you, using the context-sensitive right-click menu, to name your queries and organize them in folders. It is also possible to save queries/sets into XML files and load them accordingly. You can even save, load or delete several queries/sets at the same time.
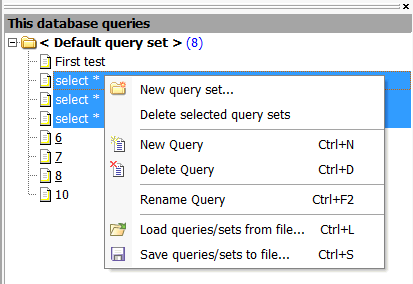
It can be blended in and out by clicking the Manage queries icon in the SQL Editor toolbar. When closed, the query list appears in the traditional style in button form below the Edit window:
A set of options and settings for this feature can be found in the IBExpert Options menu under Environment Options / SQL Editor.
Edit page
 tutorial available.
The Edit page appears as the active window when the SQL Editor is opened. It is the main input window for SQL commands. If you are new to SQL then we recommend first viewing our tutorial video, SQL basics.
The SQL Editor toolbar and right mouse button menu (SQL Editor menu) offer a wide range of operations.
IBExpert has a number of features that really make your life easier when writing SQLs, such as [F1] context-sensitive keyword help, automatic Inserting text, Code Insight, Select database object and Code formatting. You can find out more about all code editor features in our tutorial video, SQL code editors.
The lower status bar displays the number of open queries, allowing these to be quickly loaded in the active editing window by clicking on the respective buttons. Alternatively [Ctrl + N] can be used to load the next statement or a new window can be loaded using [Shift + F12] (IBExpert Tools menu item New SQL Editor).
The SQL Editor allows you to prepare statements and get a statement plan without having to execute your SQL by using [Ctrl+F9]. To prepare only a part of a statement just select the corresponding part of the statement and press [Ctrl+F9] or click the Prepare button on the SQL Editor toolbar. It is possible to view a list of query columns following preparation, on the Query Columns page in the lower panel.
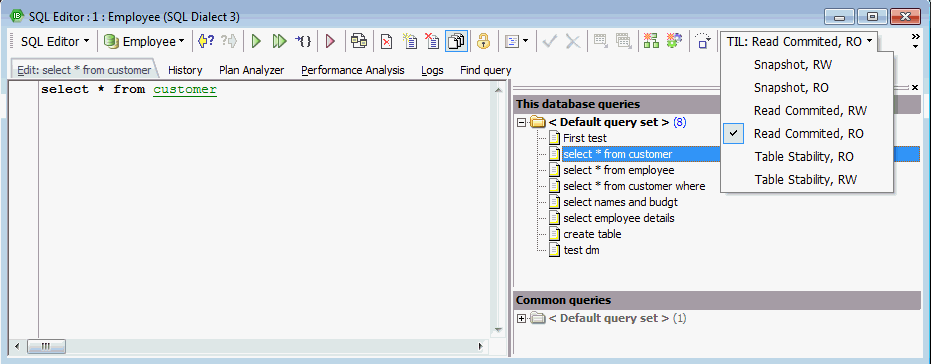
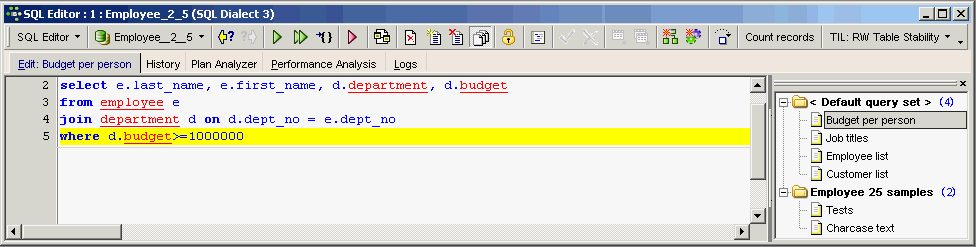
You can easily execute and analyze statements (or parts of them) before finally committing. And you can quickly change the Transaction Isolation Level (TIL) for a separate SQL Editor. There is a corresponding button on the SQL Editor toolbar which allows you to select one of the following isolation levels: Snapshot, Read Committed, Read-Only Table Stability and Read-Write Table Stability.
It is also possible to customize the highlighting of variables. Use the IBExpert menu item Options / Editor Options / Color to select color and font style for variables. The Editor font size can be stored for each query individually; and the font size can be increased/decreased using [Ctrl] + mouse wheel.
A Code Insight system is included to simplify command input and database objects are underlined for easy recognition.
There is also a wide range of keyboard shortcuts available in the SQL Editor, e.g. [Ctrl + Alt + R] produces a list of all triggers which can be selected using the mouse or directional keys (insert using the [Tab] key); a marked block of code can be indented with [Ctrl + Shift + I] or moved back using [Ctrl + Shift + U] (although [Tab] and [Shift + Tab] works here just as well). Please refer to Localizing Form further keyboard shortcuts. To view the full list call the Localizing Form using [Ctrl + Shift + Alt + L]. To customize shortcuts and/or create your own, please refer to Keyboard shortcuts / hotkeys (Localizing Form).
Hyperlinks allow you to quickly reference database objects if necessary.
There are a number of options to customize the appearance of the code in the text editor. Please refer to SQL code editor for details, and to the IBExpert Options menu item, Editor Options, to view and specify all options available.
Firebird 2.0 blocks can also be debugged directly in the SQL Editor (or alternatively in the Block Editor) using the Block Debugger. Simply click the Debug icon to open the Block Editor:
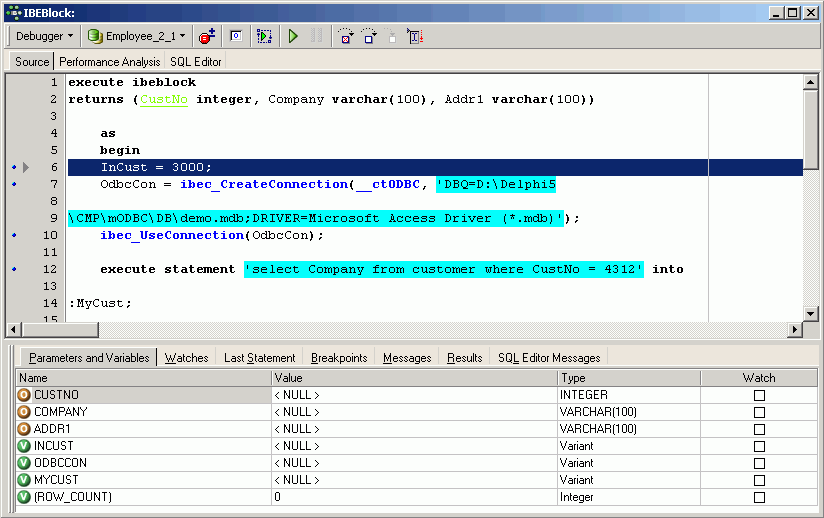
For further information regarding this Editor, please refer to Debugger.
When you have completed your SQL you can either:
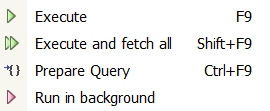
- Prepare the query using [Ctrl + F9] or the corresponding toolbar icon.
- Execute the query using [F9] or the green arrow icon.
- Execute and fetch all using [Shift + F9] or the green double arrow Icon.
- Run the query in the background by clicking on the red arrow Icon. This is particularly useful if, you have a long query running (or a backup or restore) and wish to execute further queries on other database(s) while it is running.
Following query execution the returned data is displayed below the code editor (default setting), unless the SQL Editor has been reconfigured to display the query results on a separate Results page. Use the IBExpert Options menu item Environment Options / Tools / SQL Editor to activate the Separate Results page checkbox to display query and results on separate pages.
Inserting text
Objects and fields can be simply and quickly dragged and dropped from the DB Explorer and SQL Assistant into the Edit page. When an object node(s) is dragged from the DB Explorer or SQL Assistant, IBExpert opens a Text to insert dialog.
When dragging a database node from the DB Explorer tree into any code editor:
- the CONNECT database statement
- the CREATE DATABASE statement
- IBEBlock with the ibec_CreateConnection function.
- IBEBlock: ibec_CreateConnection()
- IBEBlock: ibec_CreateDatabase()
- IBEBlock: ibec_DropDatabase()
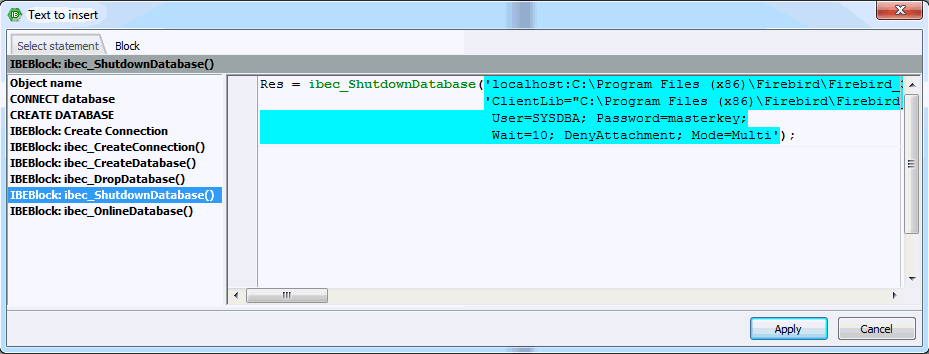
- IBEBlock: ibec_ShutdownDatabase()
- IBEBlock: ibec_OnlineDatabase()
By dragging a table or view name, all fields are automatically inserted in to the editor. Single or multiple fields can be dragged from a single table, by selecting with the [Ctrl] or [Shift] key depressed. Here the following statements are offered:
- Fields/Parameters list
- SELECT
- SELECT INTO
- FOR SELECT
- INSERT INTO
- INSERT INTO ... RETURNING
- INSERT INTO ... SELECT
- UPDATE OR INSERT
- DELETE FROM
- DECLARE VARIABLE
- DECLARE VARIABLE ... TYPE OF COLUMN
- DECLARE VARIABLE ... TYPE OF <domain>
- DECLARE VARIABLE ... <domain>
- Name + Type
- Name + TYPE OF COLUMN
- Name + TYPE OF <domain>
- EXECUTE BLOCK #1
- Block example AVX
- Block example AVX 2
- Autoincrement trigger
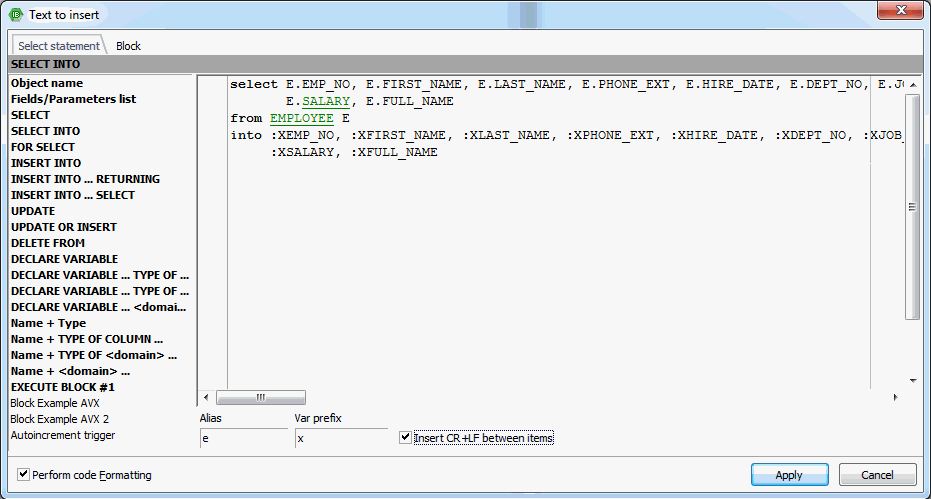
Here you can also quickly create your table aliases by entering a table alias just once, it is then automatically inserted after the table name and as a prefix for all relevant fields. And check the CR+LF (Carriage Return/Linefeed) box if you'd like your code to be aligned.
If you wish to override this function and insert only a node caption, such as the database alias, just hold down [Ctrl] or [Shift] key when you drop a node.
The INSERT INTO command can be used, for example, for inserting data into a new or existing table, or even into another database. Please refer to the Firebird administration using IBExpert chapter, Transferring data to a new table or another database and Firebird 2 blocks.
The Block page is of course for IBEBlocks:
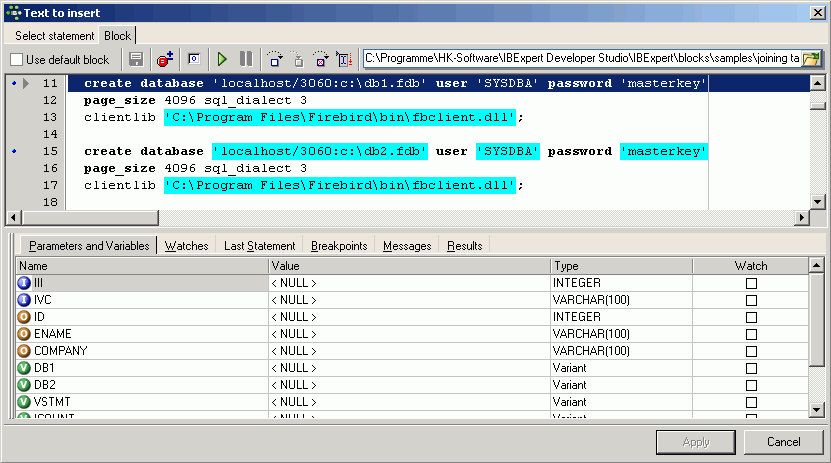
You can use the Default Block (checkbox option), one of the IBEBlock samples or load your own customized IBEBlock (for example, Default Block adapted to include domains. Further information can be found in the IBEBlock documentation.
Code Insight
A Code Insight (aka Code Completion) system is included in the IBExpert SQL code editors to simplify command input. When the first word characters are typed in the SQL Text Editor, alternatives for word completion are offered in a pop-up list. Simply click the required word, or select the word using the directional keys and insert using the [Tab] key.
Alternatively the key combination [Ctrl + space bar] can be used to explicitly activate the Code Insight dialog. Database objects are underlined for easy recognition. If you wish to view a list of parameters/variables, use the key combination [Ctrl + Alt + Shift + L]. This solution has been offered as it would otherwise be necessary to parse the editor each time before the Code Insight list appears.
It is also possible to display a list of object names containing a specified string (instead of displaying only those starting with the specified string). Simply insert the dollar sign ($) at the beginning of the string, for example, $tmp + [Ctrl + space bar] will list all database objects (SQL keywords, etc.) containing tmp in the object name. Alternatively you can also use two asterisks (* *) to get the same result: *tmp* + [Ctrl + space bar].
To call a list of certain database objects, use the logical key combinations, for example, when the key combination [Alt + Ctrl + T] is used, IBExpert offers a list of all tables beginning with the initial letter(s) already entered.
IBExpert also recognizes table aliases and automatically offers a list of all fields in the alias table, e.g. by defining the JOB table with an alias J. By holding down the [Ctrl] key you can select multiple fields, e.g. job_code, job_grade and job_country. By pressing the [Enter] key all fields would be automatically inserted into the SQL with the alias prefix J.
Using the IBExpert menu item, Options / Editor Options / Code Insight, this can be individually adapted as wished.

Further abbreviations and definitions can be specified using the IBExpert menu option, Options / Keyboard Templates.
Please note that system object information will only be offered by the Code Insight lists if these objects are visible in the Database Explorer. To list these objects in the DB Explorer, you will need to check the Show system tables and Show objects' details options found in Database Registration Info / Additional / DB Explorer.
Hyperlinks
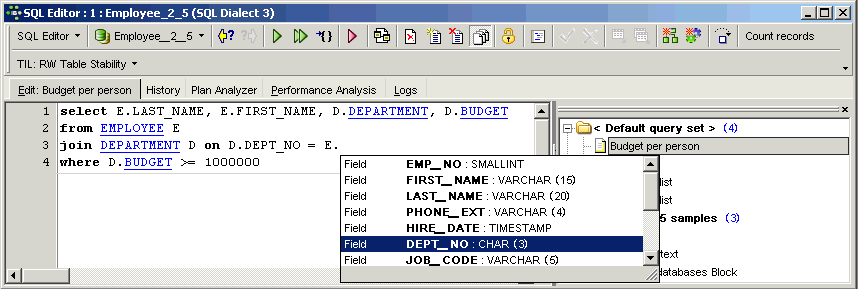
As with all IBExpert editors, the SQL Editor even offers hyperlinks. When an object name is written on the Edit page, the respective object editor can be opened by double-clicking on the hyperlink name.
To switch off the automatic hyperlink option, or to change its appearance, please refer to Options / Editor Options.
Create view or procedure from SELECT
If you wish to create a view or procedure from a valid SELECT statement in the SQL Editor, simply use the relevant icon to the right of the toolbar. It is possible to create a view or a procedure from an SQL statement without typing all variables and parameters. It is even possible to turn query parameters into the input parameters of a stored procedure:
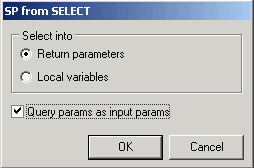
When creating a procedure from a select it is necessary to specify whether to select into return parameters or local variables.
IBExpert offers some other interesting features which can be referred to in the Special features chapter below.
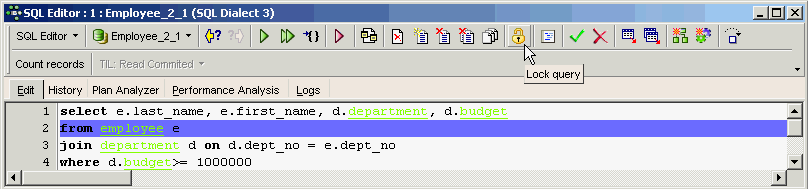
Lock query
The option allows you to lock queries, to protect them against accidental alteration and/or deletion.
Please note here that the Delete all action will delete ALL queries, including those locked.
Results
The Results page is automatically generated as soon as a query is executed. The returned data is displayed below the code editor (default setting), unless the SQL Editor has been reconfigured to display the query results on a separate Results page. Use the IBExpert Options menu item Environment Options / Tools / SQL Editor to activate the Separate Results page checkbox to display query and results on separate pages. When deactivated, the results appear in a window below the query. When using earlier versions of IBExpert, the results are always generated on a separate page in the SQL Editor.
The Environment Options' SQL Editor page can also be used to specify whether all records corresponding to the query should be extracted from the table, or just those result sets that fit onto the Results page view.
There are three modes of view:
1. Grid View
All data is displayed in a grid (or table form). By clicking on the column header the result set can be sorted (in ascending or descending order) according to that column. New data sets can also be added, altered and deleted here. And all operations, as with any operations performed anywhere in IBExpert, may be monitored by the SQL Monitor (started from the IBExpert Tools menu), particularly useful, should problems be encountered with SIUD operations.
Further information regarding the Grid View can be found under Table Editor / Data.
There are many options to be found in the IBExpert Options menu item, Environment Options / Grid, which allow the user to customize this grid view. Additional options are offered in the IBExpert menu items Register Database or Database Registration Info, for example, Trim Char Fields in Grids.
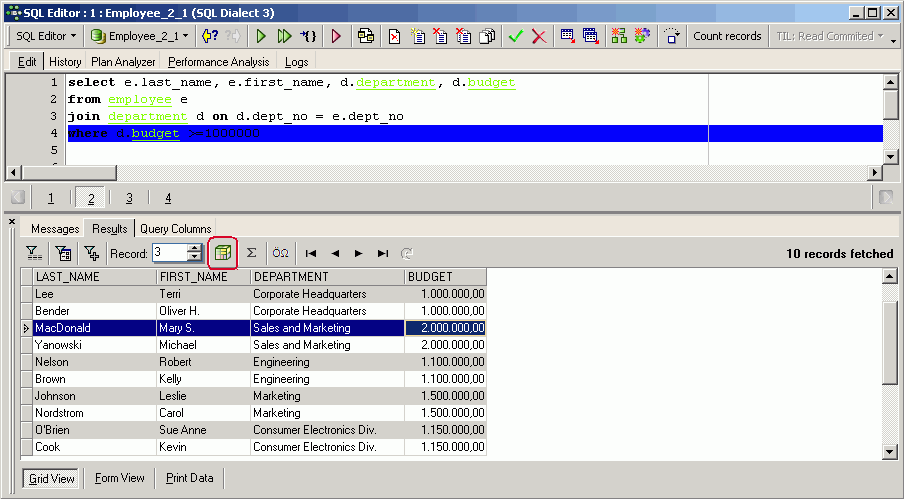
Results can only be edited in the Grid View if they are a live result set. Selected record(s) can be copied to clipboard as UPDATE statement(s). This will only work on a live query with a primary key. Captions of NOT NULL fields are displayed in bold.
The OLAP and data warehouse tool, Data Analysis, opened using the Data Analysis icon (highlighted in red in the above illustration).
There is even an option to calculate aggregate functions (COUNT, SUM, MIN, MAX, AVG) on NUMERIC and DATE / TIME columns. Simply click Show summary footer button on the navigation toolbar in the grid view to display the summary footer:
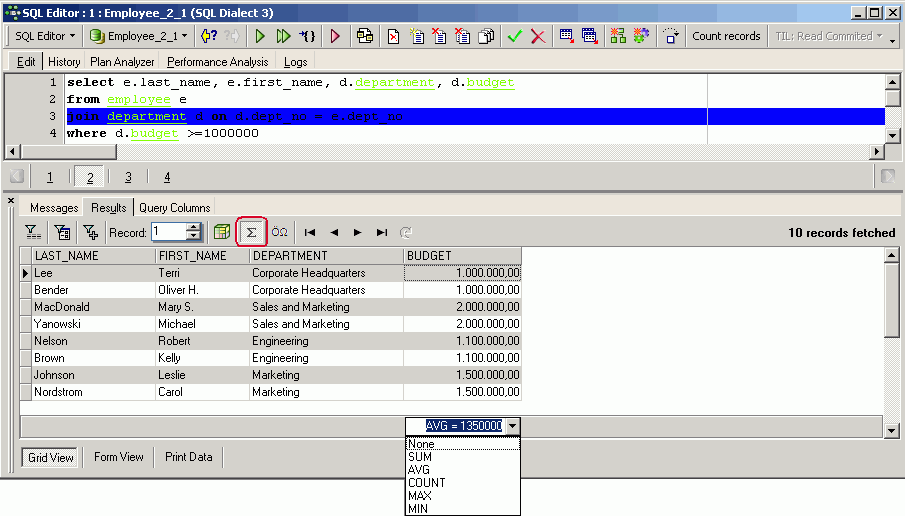
Then select the aggregate function from the drop-down list for each NUMERIC / DATETIME column as required.
IMPORTANT: these calculations are all done on the client side so do not use this feature on huge data sets with millions of records because IBExpert will fetch all records from the server to the client in order to calculate aggregates.
Display data as Unicode: Simply click the relevant icon or use [F3] (see illustration below). It is not possible to edit the data directly in the grid. To edit data in unicode, use the Form View or modal editor connected with string cell. To convert text from/to unicode, select the text to be converted, or select none to convert the entire content of the code editor.
2. Form View
One data set is displayed at a time in a form-type display.
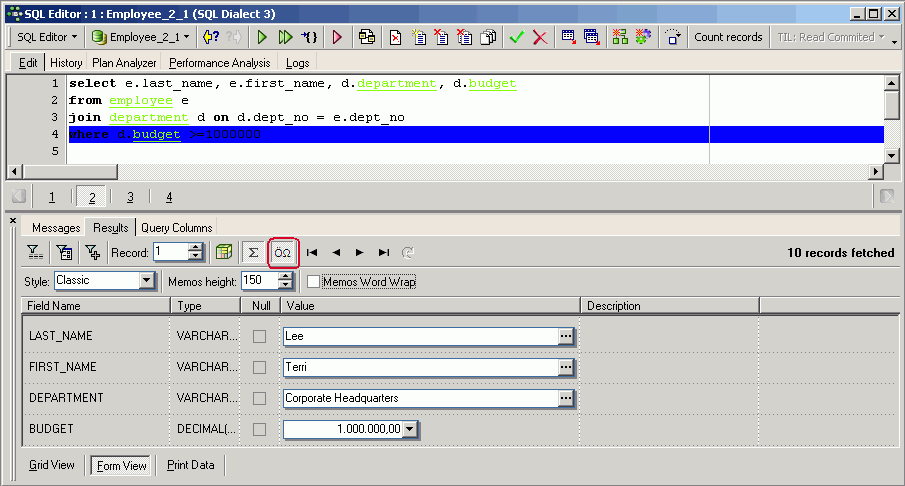
The Form View displays field descriptions. It is also possible to select alternative layouts (select Classic or Compact from the drop-down list), the compact alternative for those who prefer a more compact and faster interface. Visual options now also include specification of Memo Height and Memo Word Wrap.
Further information regarding the Grid View can be found under Table Editor / Form View.
3. Print Data
Displays data in WYSIWYG mode, the data can be either edited and saved to file as a simple report or printed.
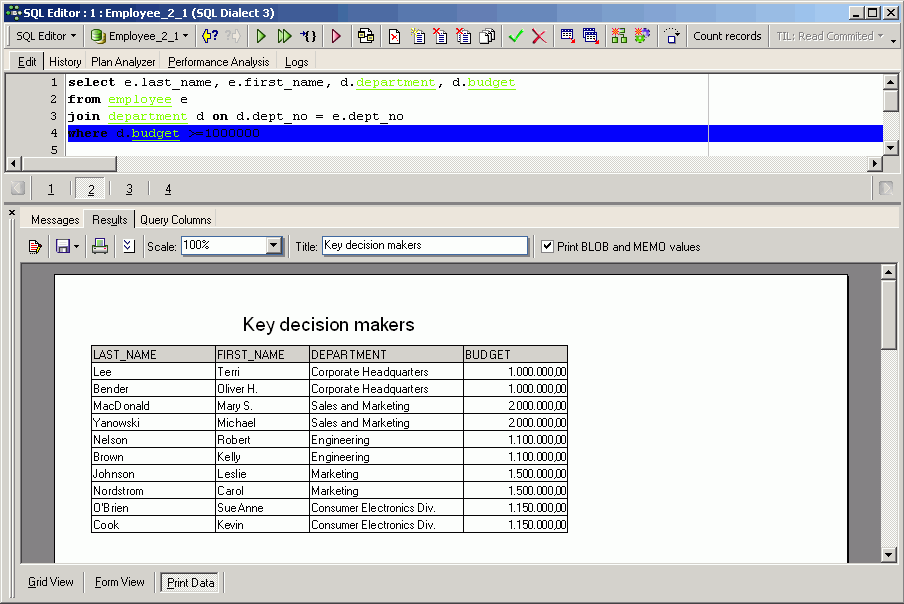
Further information regarding the Print Data can be found under Table Editor / Print Data.
Messages and Query Columns
If you have checked the Separate Results page in the Environment Options / SQL Editor you will see two pages: Messages and Query Columns below the Results page:
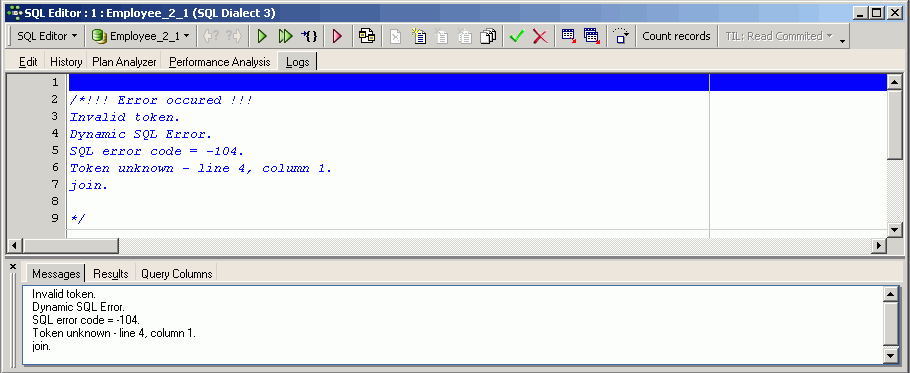
Any error messages which may appear on the Messages page may be consulted in the Firebird 2.1 error codes documentation. If these error messages are important, you can copy them for further analysis simply by right-clicking in the Messages content area, and selecting copy errors to clipboard to copy them into the Script Executive.
If you have defined your results to appear below the Edit page, you will find Messages and Query Columns to the left and right of the results:

The Results page also has its own right-click menu, which can be used to perform numerous operations upon the resulting data (please refer to Table Editor / Data for more information).
Filter Panel
It is possible to work with filters on your results and also on data displayed on the Table Editor's Data page (Grid and Form view), allowing the addition/deletion of criteria and filters directly in the data sets resulting from the executed SQL.
The Filter Panel is opened using the Show Filter Panel icon:

or [Ctrl + Alt + F]. A new two-part window appears. This can be split horizontally or vertically by clicking on the Vertical Layout icon or using the key combination [Shift + Ctrl + L].
New filter criteria can be added by placing the cursor on the field, where a filter is to be inserted, and using the +-button or [Ins] key. To delete filters use the - button or [Ctrl + Del] key combination. Select the comparison operator from the pull-down list adjacent to the list of field names and specify the desired value(s).
When a second field is marked and a new filter for this field is added, the AND column is automatically filled (default is AND, may be altered to OR if wished, using the space bar or mouse click). The two right-hand columns provide check box options, to specify whether a filter should be active or not (column A), and to specify whether case-sensitivity is of importance (CS column). The second panel displays the WHERE clause that has just been specified. The number of filtered records is automatically recalculated when the filter condition is changed.
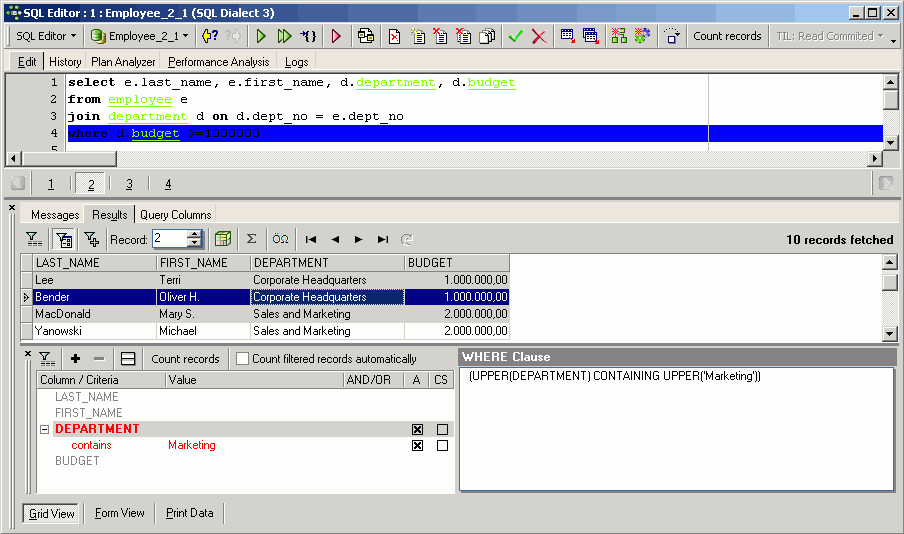
The filter area can be deactivated by re-clicking the Show Filter Panel icon or [Ctrl + Alt + F].
Export Data
Please refer to Export Data for further information.
Export Data into Script
Please refer to Export Data into Script for further information.
Alternative export methods can be found in the following documentation chapters:
- Import & export using IBExpert (1)
- Import & export using IBExpert (2)
- IBEBlock examples including data import and export
- Firebird administration: import & export
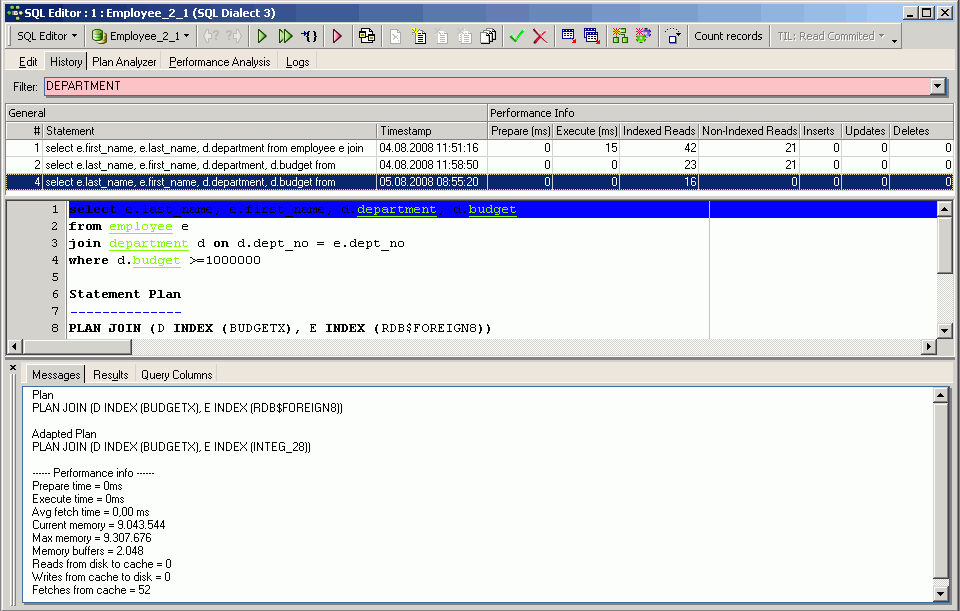
Statements History
The History page can be found in the SQL Editor, and lists previous SQL queries that have been executed and produced a result (not necessarily committed), along with their performance statistics. This saves having to reenter recurring commands, and offers a concise overview of individual SQL performances for comparison. All statements are only visible when the same database alias is in use.
The Find query page allows you to search for queries in histories and sets of the SQL Editor queries of any registered database, as long as you have the IBExpert User Database (Options / Environment Options / IBExpert User Database) enabled. Please refer to Find query for details.
Below this list, the middle panel displays the script of a selected query.
The filter (directly above the statement list) can be used to display only those objects containing the character string entered in the filter, e.g. Find all SQLs containing a SELECT or all SQLs containing DEPARTMENT.
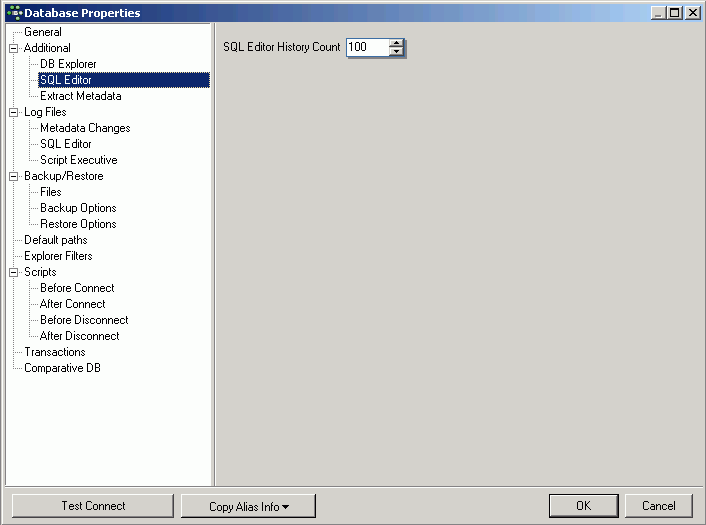
The SQL History lists a record of the last 100 statements. This default quantity of 100 stored statements can be altered by using the IBExpert menu item Database or the DB Explorer right mouse button menu: Database Registration Info / Additional / SQL Editor, where the SQL Editor History Count can be specified as wished.
The SQL History list can be streamlined, as and when required, by deleting individual list entries, using the right mouse button.
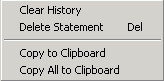
This menu also allows single statements (or all) to be copied to clipboard.
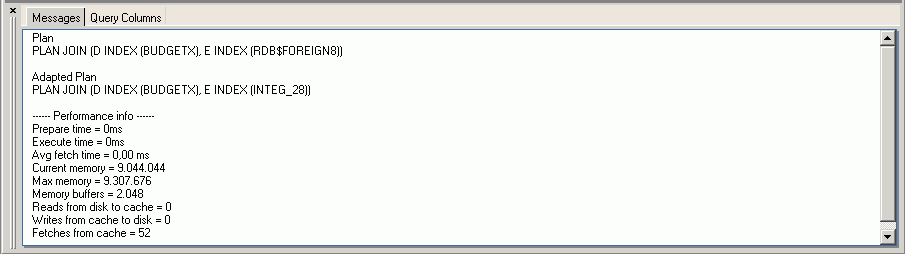
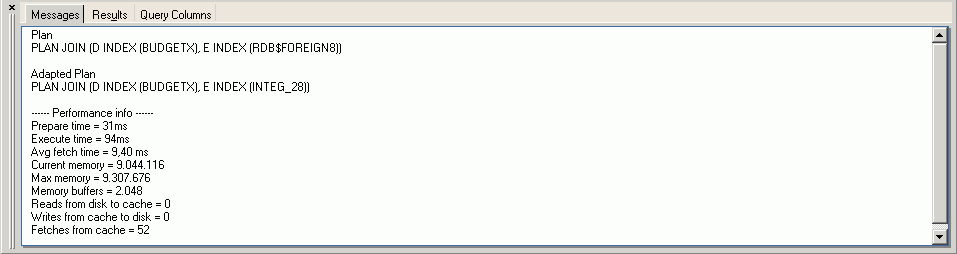
Plan Analyzer
The SQL Editor Plan Analyzer (also a part of the Procedure Editor and Trigger Editor) shows how Firebird/InterBase® approaches a query, e.g. with SORTS, JOINS etc., which tables and indices are used. This information is displayed in a tree structure: firstly what and which data quantities, and secondly what is carried out with this data and how. (This feature is unfortunately not included in the free IBExpert Personal Edition?.)
The plan is an Firebird/InterBase® description, showing how the Optimizer uses tables and indices to obtain the result set. If the word SORT is displayed, you should check whether improvements upon the query or the indices are possible.
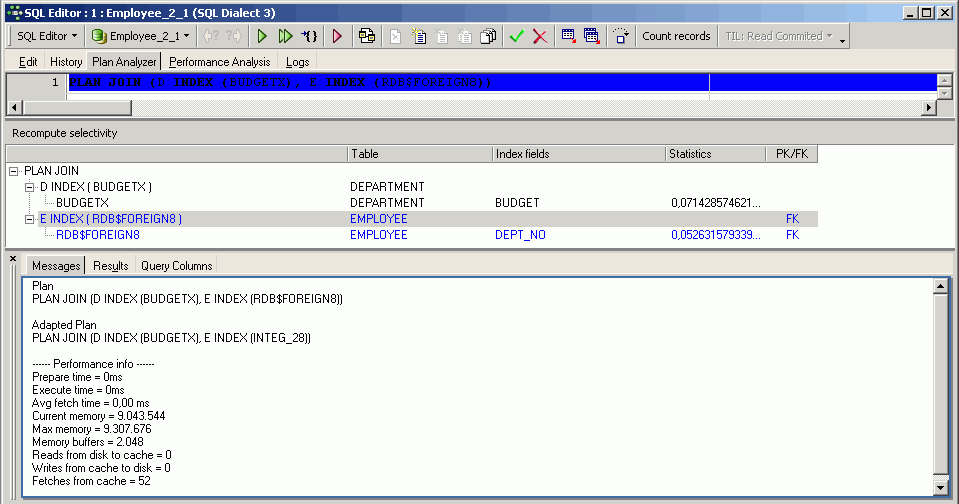
The Plan Analyzer provides information in the center panel in a tree structure with statistics, and a summary of the plan and performance is listed in the lower panel.
Use the Recompute selectivity button to recompute the selectivity of all indices. For further information regarding the use and effects of indices in queries, please refer to Index statistics and Using the PLAN operator.
Performance Analysis

Tutorial

Tutorial
The Performance Analysis is part of the SQL Editor, Visual Query Builder, Debug Procedure/Trigger Editor and Stored Procedure Editor. It displays information showing how much effort was required by Firebird/InterBase® to carry out an executed query or procedure. The analysis is performed after a SELECT statement is opened or a stored procedure started. (This feature is unfortunately not included in the free IBExpert Personal Edition?.)
It is possible to deactivate the Performance Analysis, by checking the Disable Performance Analysis option, found under Database / Register Database or Database Registration Info / Additional. This may be desirable when working remotely with a slow modem connection.
It is however often interesting to know what exactly a procedure or query does and how; and all this can be viewed in the Performance Analysis. The main advantage here of course, is the possibility to compare the performance of different queries and procedures.
Graphical Summary
The Graphical Summary provides an overview, broken down by the tables involved, of the number of operations performed by the query/procedure, including reads (indexed and non-indexed), updates, deletes and inserts. It shows whether indices have been used indicating the efficiency of the database's indices. The figures displayed refer to the number of data sets.
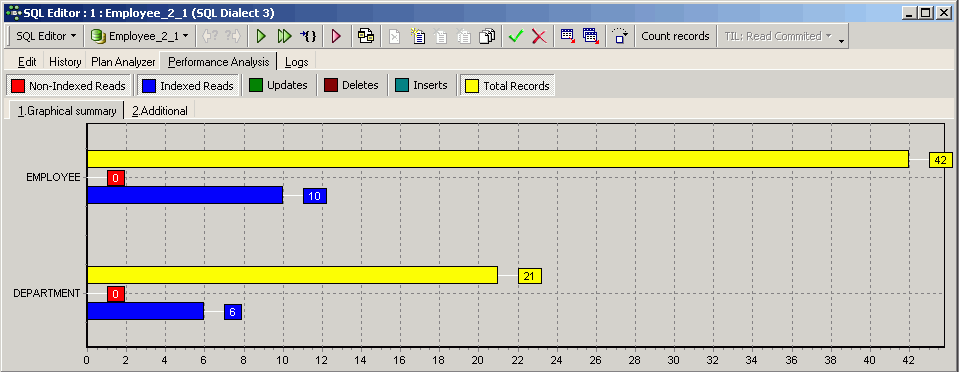
The x-axis lists the names of the tables consulted by the query/procedure, with the number of operations displayed graphically. Click the performance type you wish to view, and it will be added to the graph. Click the button again, to remove it.
SELECT statements will only have a Reads result, but some stored procedures will also have results for Updates, Deletes and/or Inserts.
The operation types are as follows:
- Non-indexed reads: A non-indexed reads indicates that the data was read without the aid of an index. In most situations this can be both time- and memory-consuming. Non-indexed reads always include a large number of data sets, as the server needs to search through the whole table(s) to find the relevant information. All data pages? from these table(s) need to be loaded into the cache.
- Indexed reads: An indexed read indicates that the data was selected by the Firebird/InterBase® server using one or more indices (named in the query plan displayed on the Messages page in the lower panel).
- Updates: This displays the number and type of updating operations in an executed query/procedure. The figures displayed refer to the number of data sets, broken down by table.
- Deletes: This displays the number and type of deleting operations in an executed query/procedure.
- Inserts: This displays the number and type of inserting operations in an executed query/procedure.
- Total number of records: This displays the total number of records consulted.
In the SQL Editor the lower panel displays the query plan, along with a summary of the performance information included on the Additional page. For further information regarding the query plan, please refer to the Plan Analyzer.
Additional
This displays a statistical report. The Enhanced Info displays a statistical summary of the information shown in the Graphical Summary. Certain additional information, such as query time, memory and operations, is also included in this section.
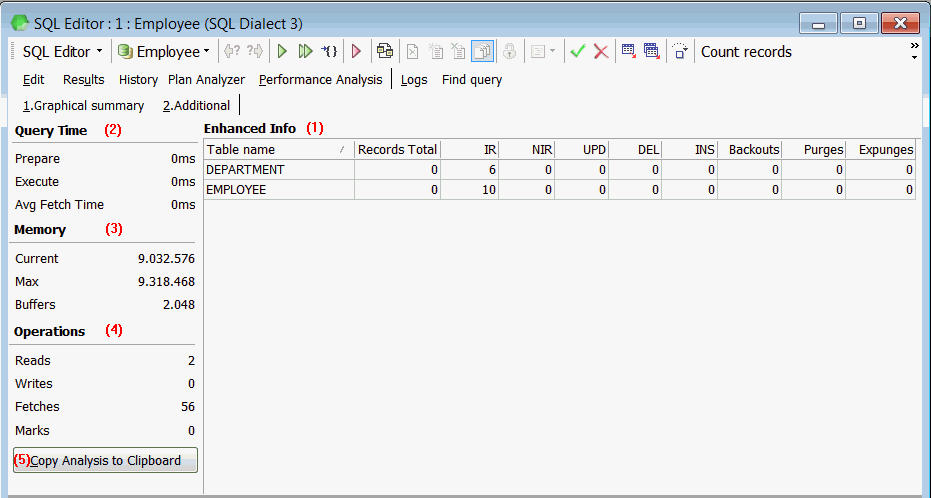
The analysis displayed on the Additional page can also be documented using the Copy Analysis to Clipboard button.
(1) Enhanced Info
The Enhanced Info displays a statistical summary of the information shown in the Graphical summary.
The names of tables consulted during execution of the query/procedure are listed in the first column, with the number of data sets listed according to the following criteria:
- IR = Indexed Read
- NIR = Non-Indexed Read
- UPD = Updates
- DEL = Deletes
- INS = Inserts
- Backouts = Number of records where a new primary record version or a change to an existing primary record version is backed out due to rollback or savepoint undo.
- Purges = Number of records where record version chain is being purged of versions no longer needed by OAT or younger transactions.
- Expunges = Number of records where record version chain is being deleted due to deletions by transactions older than OAT.
The last three items, Backouts, Purges and Expunges provide information collated by the system table, MON$RECORD_STATS, which collates record-level statistics. Further information can be found in the Firebird 2.1.3 Release Notes chapter, MON$RECORD_STATS.
(2) Query Time
Query time shows the time needed to prepare for the execution of the query/procedure, along with the execution time and average fetch time.
Prepare: This measures the preparation time required by Firebird/InterBase® to plan and prepare the query/procedure execution, i.e. from the moment when the source text is sent to the server and is compiled on the server in binary form (it decides which indices, tables etc. need to be used to perform the query/procedure).
When a query/procedure is executed a second time, the query time is usually 0 ms, as it has already been prepared.
Execute: This measures the direct execution time of the command.
Avg fetch time: This shows the average fetch time pro data set. This figure is calculated based only on those data sets that can be seen in the returns and does not include those that are not yet visible. An optimal analysis can be attained when the query/procedure is executed using [Shift + F9] = Execute and Fetch all.
(3) Memory
This shows the memory development during and following execution of the procedure/query.
Current: This displays the current memory used by the server.
Max.: This displays the maximum memory used by the server during execution of the query/procedure.
Buffers: This displays the number of data pages that are being held as cache on the server (from InterBase® 6 onwards the standard is 2,048). This can be found in the corresponding configuration file: since Firebird 1.5 it is called firebird.conf; in older Firebird versions or InterBase®, it is called ibconfig, found in the main InterBase® directory.
This can be altered for the current database if wished, using the IBExpert Services menu item, Database Properties / Buffers. The total KB is calculated according to the current database page size. For an alteration to become effective, it is necessary for all users to disconnect from the database and then reconnect. Buffers are only reserved if they are really necessary for pages loaded from the database file.
(4) Operations
Operations displays the number of data pages that were read from the database file to the memory, written and fetched, while executing the query/procedure.
Reads: This displays the number of pages read for the executed query/procedure. This is necessary when data sets have to be loaded, that are not already in the memory.
Writes: This displays the number of pages written while executing the query/procedure. If the total cache buffers are too small to load subsequent pages, it may be necessary for the server to save altered pages to the hard drive, in order to make room for further pages to be loaded. If these values are very high, it may be wise to increase the buffers, providing of course that physical memory is sufficient.
Fetches: When a query/procedure is started, the command (or series of commands) is sent to the database server. To obtain results, numerous data sets/pages need to be referred to (= fetch), in order to perform the operation. Fetches are, in other words, internal operations performed by Firebird/InterBase® in order to successfully execute a query/procedure. This indicates, for example, if deleted data sets in a SELECT are recognized as deleted, they will still appear here in the number of fetches, as the server also searches through those data sets that have been marked as deleted. This can however offer an advantage over the number of indexed and non-indexed reads, as these only display operations on undeleted data sets. If the query is executed again, the result will be quicker if the garbage collection is running simultaneously.
Using the Performance Analysis, the number of fetches in data pages could possibly indicate why one query is quicker than another with an equal number of data sets and the same index plan.
Marks: displays the number of pages changed while in the cache. It is possible that not all of these have been written back to disc.
All four items here are collated in the system table, MON$IO_STATS which collates I/O statistics. Further information can be found in the Firebird 2.1.3 Release Notes chapter, MON$IO_STATS.
See also:
Firebird Database Cache Buffer: Using MON$IOSTATS
(5) Copy Analysis to Clipboard
The Copy Analysis to Clipboard button copies all information included in the Additional page, including both the grid contents (= Enhanced Info) and the statistics listed in the left-hand panel (= query time, memory and operations).
The Copy Analysis to Clipboard button can be found in the bottom left corner of the dialog in the Performance Analysis. Should this not be visible, it is probably because the windows in IBExpert are set to Cascading. This can be easily solved by clicking the SQL/Procedure Editor window to full-size (right-hand blue icon in the dialog title bar).
Logs
The Log page can be found in the SQL Editor and displays a list of qualified error messages etc. It shows what Firebird/InterBase® did and when it did it in each respective SQL window. EXECUTE BLOCK statements are also logged here.
Find query
It is possible to share SQL Editor queries between registered databases, so-called Common queries. These queries are available from any of your registered databases.
The Find query page allows you to search for queries in Histories and sets of the SQL Editor queries of any registered database. It is also possible to perform searches in IBEBlocks and Firebird blocks stored in the IBExpert User Database.
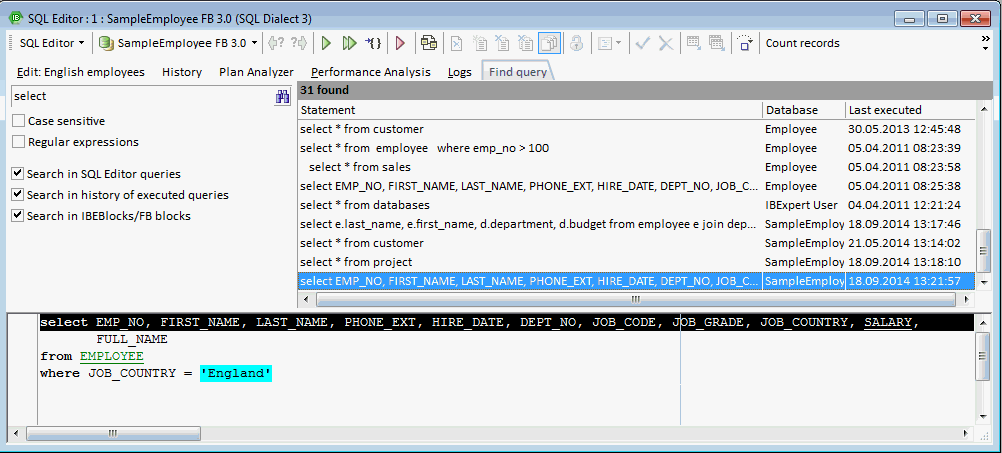
Note: The Last executed column makes sense only for queries from the query history which have a corresponding timestamp value.
Please note that this feature is only available if the IBExpert User Database is enabled (see Options / Environment Options / IBExpert User Database).
Optimizing SQL statements
tutorial available.How does Firebird/InterBase® process a query? SQLs are sent to the server, where the Optimizer first analyzes them: which tables are involved and which indices are the best to use etc., preparing them for execution. The server needs to select a strategy for creating a result set. The parser selects all tables involved and possible indices, usually selecting the index with the best selectivity, i.e. the one resulting in the smallest result set. Further information regarding index selectivity can be found in the Index statistics chapter.
The index statistics are compared in order to choose the most selective index for each WHERE, JOIN or ORDER BY condition.
In Firebird/InterBase® it is possible to use more than one index, which isn't possible in some other databases. Compound indices should however only be used when really necessary. An ORDER BY is no reason for using an index, because an ORDER BY always has something to do with output formats. Usually WHERE conditions are used to limit the result set. WHERE and JOIN conditions should certainly be supported by an index. If you specify an ORDER BY over several fields, the index needs to be composed in exactly the same sequence as the ORDER BY. ORDER BY cannot accept compound indices composed of single indices.
The index plan is made during the preparation, and it is at this stage that the Optimizer selects in which sequence it will use the indices chosen. If the server cannot find a suitable index, it compiles a temporary sort quantity.
Take into consideration that when the LIKE command is used together with a wildcard (because you're searching a string that occurs somewhere in the field and not necessarily at the beginning), the Optimizer cannot use an index.
All table data needed is read from the cache. If the pages required are not already in the cache, they need to be transferred from the hard disk to the memory. This is the most time-consuming part of the operation for the Firbird server. If this process appears to be somewhat slow, check the parameters in firebird.conf. Please refer to Temporary files and Memory configuration in the Firebird Administration using IBExpert documentation.
After preparing your query, Firebird displays the query plan - which can be viewed in the SQL Editor's index plan, visible in the Plan Analyzer. If a lot of non-indexed reads (highlighted in red) appear in the Performance Analysis, it is often helpful to create some indices, reopen the query and check if it has been of help.
Following preparation, if no changes are to be made, the query can be executed.
When all data has been extracted and sorted accordingly, the result set is sent back to the client issuing the query. If only the first n records are to be fetched, the server only reads the required number of data pages. For certain commands such as DISTINCT and GROUP BY, the server must read all relevant data pages. So if DISTINCT or GROUP BY are not really necessary, don't use them!
Check the Performance Analysis and use it to compare different versions of the same SQL. Analyze the reads, writes and fetches! Reads and writes are typically 0 when Firebird/InterBase® can operate in the cache. Fetches are the internal operations in Firebird/InterBase®, so when one query is slower than the other, it may not be visible directly in the graphical view, for example when Firebird/InterBase® creates external temporary sort files.
Use the Plan Analyzer to analyze how the Optimizer uses tables and indices to obtain the result set. If the word SORT is displayed, you should check whether improvements to the query or the indices are possible.
Although the Optimizer does a very good job, especially since Firebird 2.0, the programmer can often offer the Optimizer hints to help improve performance; depending on the task in hand, a small change in the SQL statement can often improve the speed immensely. For example, consider using the +0 field parameter to deactivate indices with a low selectivity, perhaps derived tables can reduce the number of reads or fetches. Other factors affecting the performance of queries, such as hardware, OS and memory configuration, index selectivity, etc. can be referred to in Firebird administration using IBExpert.
Special features
The IBExpert SQL Editor has two special features that allow you to:
- Create a table from query results and populate it with data.
- Move data between two registered databases.
Creating a table from query results
As everyone knows it is possible to insert data into any table by executing the INSERT statement:
 INSERT INTO TARGET_TABLE
    SELECT FIELD_1, FIELD_2 FROM SOURCE_TABLE
    WHERE SOMETHING_FIELD <> 5
However this will only work if the table TARGET_TABLE already exists in the database. IBExpert enables execution of this kind of statement even if the TARGET_TABLE does not exist in the database. First IBExpert notifies the user that TARGET_TABLE doesn't exist in the database and offers to create this table using query structure. If confirmed, IBExpert creates the TARGET_TABLE and then populates it with data from the SELECT.
A small example illustrates how this works, based on a SOURCE_TABLE with the following structure:
 CREATE TABLE SOURCE_TABLE (
    ID INTEGER,
    SOME_TEXT VARCHAR(50),
    SOME_PRICE NUMERIC(15,4),
    SOME_DATE DATE);
When the following statement is executed:
 INSERT INTO TARGET_TABLE
    SELECT * FROM SOURCE_TABLE
and there is no TARGET_TABLE in the database, IBExpert will create TARGET_TABLE as:
 CREATE TABLE TARGET_TABLE (
    ID INTEGER,
    SOME_TEXT VARCHAR(50),
    SOME_PRICE NUMERIC(15,4),
    SOME_DATE DATE);
and after that inserts into this table records retrieved with the SELECT part.
Of course, it is possible to write different INSERT statements. For example:
 INSERT INTO [TARGET_DATABASE].TARGET_TABLE
    SELECT ID, SOME_DATE FROM TEST_TABLE
In this case IBExpert will create table TARGET_TABLE as
 CREATE TABLE TARGET_TABLE (
    ID INTEGER,
    SOME_DATE DATE);
Moving data between databases
IBExpert allows you to move data from one database to another by executing a special statement in the SQL Editor.
Syntax
 INSERT INTO <database_alias>.<table_name>
    [(<columns_list>)]
    <select_statement>
| Argument | Description |
|---|---|
| database_alias | Alias of a registered database. This must be enclosed in square brackets. This argument is case-insensitive so aliases My alias and MY ALIAS are equivalent. |
| table_name | Name of the table to be populated with data. |
| columns_list | List of columns in target table. This argument is not obligatory. |
| select_statement | Any SELECT statement. |
Examples
The following statement moves data from SOURCE_TABLE of the current database into TARGET_TABLE of the database with the alias My test DB:
 INSERT INTO [My test DB].TARGET_TABLE
    SELECT * FROM SOURCE_TABLE
If the table TARGET_TABLE doesn't exist in the target database, IBExpert will create it after your confirmation with the structure of the SOURCE_TABLE.
See also:
SQL Language Reference
Firebird 2.1 Language Reference Guide
Database Technology Articles
SQL basics
IBEBlock
Firebird Administration using IBExpert: Transferring data to a new table or another database
back to top of page
<< External Tools | IBExpert | New SQL Editor >>


